Saturday, 23 March 2019

Hello again

Hello and welcome back. I know it's  been a while since I've written a post on this blog but as we all know sometimes life just takes gets in the way and takes over. Sadly The Craft Barn closed last year so I've found myself with a little more crafting time on my hands.

                 Anyway less of the boring stuff and lets get back to crafting and making!


Over the recent months I have to say I've really got back into knitting and crocheting. Patterns have really moved on in the last few years, as so have all the wonderful yarns. People have got very adventurous with their designs and as for all the wonderful hand dyed sock yarns....well, its hard to find room for 'The Stash'!!!


I have certainly been enjoying the exploring side of the 'Woolly' industry and will be back soon with some details of my favourite patterns.


        So thanks for stopping by today and see you soon. Take care and enjoy your weekend. X


Sunday, 23 July 2017

The Colour Aqua

It's been a couple of months since I last did a blog entry, I must admit in the summer months most of any spare time is spent in the garden---- which is lovely. Anyway today is damp and overcast so I decided to go to the craft bench and get "mucky".


The theme over on the PaperArtsy blog is Aqua and as this is my favourite colour felt I really should make something to enter. The very first picture on the site got my creative juices following as I love how the coppery brown tones gives the whole picture warmth, so here is my inspiration.


The main image was made from Yupo coloured with alcohol inks


and white card coloured with Fresco Chalk paints.


The main image from ETS10 stamp set was stamped in Versa-Fine black ink on both pieces. In hindsight it might have been better to use Archival ink as the Yupo took ages to dry-------- over 4 hours!!!
The image was then cut out and layered. Before attaching to my card I stencilled some sunbursts using Stencil Girl's S008 stencil and Distress Oxides in Fossilized Amber and Broken China.
After attaching the cut out image I added a few dots of Liquid Pearls for added texture.


Finally the very edges of the card had a light touch of the Broken China ink just to draw the eye in.


Well I hope you enjoy the rest of the weekend, take care and thanks for stopping by today.  Jane x


Tuesday, 18 April 2017

Utee Embellishment

Hi, I hope you all had a relaxing Easter Break ----- perhaps a little 'Crafting Time' was managed. I needed to make a card for a very dear friend who is going into hospital at the end of the week for a long awaited operation and as we both share a love of flowers and gardening wanted to make the main feature something 'Flowery'.
Over on the PaperArtsy challenge blog their current theme is 'Resin and Utee' which jogged my memory for using some Utee on this project. To see the fab examples click on the link here.


Firstly I stamped my main image onto some white Smoothie card in black Archival ink. I then cut around the image leaving a slight boarder, this was then given one coat of Utee. Next a layer of Versa-Mark ink and then a sprinkling of Infusions which were lightly rubbed in with a finger. Finally 2 more coats of Utee were applied.


The background card was made by colouring some white card with Distress Oxides in Fossilized Amber and Vintage Photo on my craft mat spritzed with water. Once dry some Cracked Pistachio was added with a light sprinkling of Sage Infusions.
Then detail was added using PS051 and some Vintage Photo DO.
The sentiment is from ECL01 and was white embossed onto the blank kraft card.


Treasure Gold in Olive Bronze was added to the edges and to odd areas of the embossed vellum paper.

I would like to enter this card for the PaperArtsy Resin and Utee Challenge.

Thanks for stopping by today and all comments are greatly appreciated, thank you.
Hope you have a good week, take care and happy crafting  Jane X


Sunday, 26 March 2017

Doors !!!!

Hello, and a very Happy Mothering Sunday to all you 'Mums' out there. Today I like to share my entry for the latest PaperArtsy Challenge titled "Doors, Windows and Architecture. As I was lucky enough to be the last challenge winner I had to use some of my fabulous prize for this project.


There are some stunning examples for this challenge over on their blog site so do take 5 mins and have a look.

For the main part of the houses I used various colours of ribbed textured card and Tim Holtz 'Artful Dwellings' die. The houses were then stencilled with grunge paste and painted with a wash made from Fresco Chalk paints.


The windows were made from shrink plastic which had been stamped with a set of fab stamps by Michelle Ward. The backs of these were coloured with Pro-Markers.


A little bit of stamping on the houses before attaching the windows and doors. The clouds were added to the top of the card using Snowflake paint through the Kim Dellow stencil and the bird was stamped onto a piece of white card and cut out.


A few touches of Treasure Gold in various colours, door knobs and numbers ----- all done.


When I attached the doors to no. 3 and 27 these were left slightly ajar for added interest.

Well enjoy your Sunday everyone, I just managed to get this post done before the challenge ends......Phew ! Take care and have a good crafting week. Jane X


Friday, 10 March 2017

Bunny Heaven !

Yesterday was such a beautiful springtime day I decided to let my recently knitted Bunny Family outside for a play in the garden!!


I started by making 4, 1 for each of my Grandchildren for Easter but then I'd enjoyed playing around with the outfits so I made a few more....... apparently that's the problem with rabbits so they say!


Anyway they seemed like they had a good time.


Time for a rest!

Now I think it's time to put the wool and knitting needles away before they take over the house too.
Thanks for stopping by and meeting my new little friends, until next time enjoy your weekend and hopefully there will be some more springlike weather. 
Bye from Me and my Bunnies X


Tuesday, 7 March 2017

Paints, infusions with a scrapping of Grunge Paste

Today I've been having a session using Grunge Paste with Infusions and I have to say that I love how they react.


I decided to make my Mother's day card well in advance this year as I tend to leave it to the last minute and am not always as pleased with it as I could be. I wanted a soft, vintage look to the card as my Mum is 97yrs old and perhaps an alien monster might not be appropriate!

So started by braying Seaweed and Vanilla paint straight onto my card base, random areas of text were stamped in Archival watering Can. 
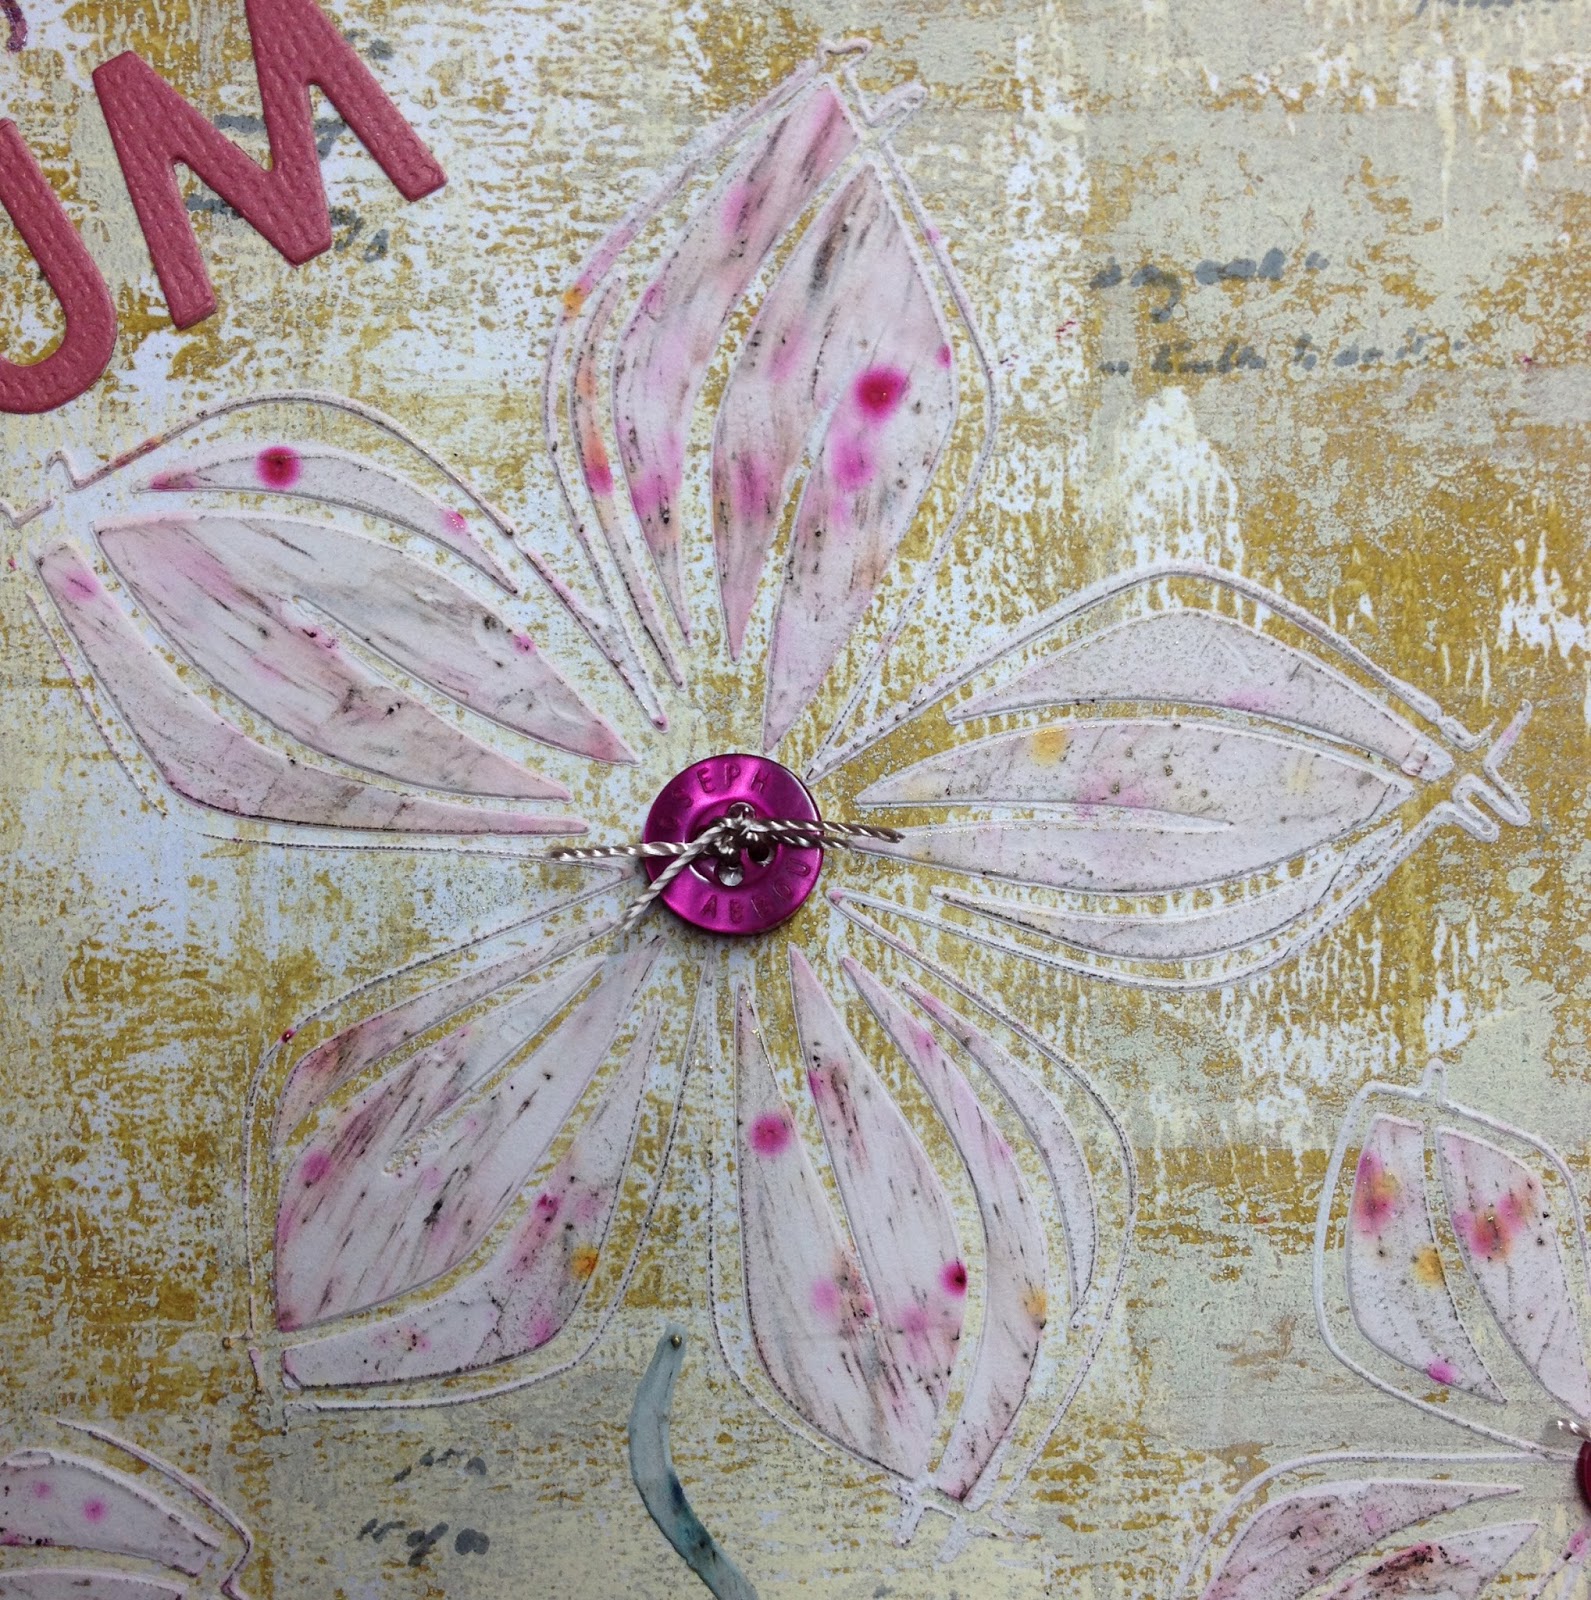
Then once dry added a little Sunset Beach Infusion to some grunge paste, just enough to take away the whiteness, This was then passed through my stencil, PS057 leaving the flower centres in place.
Leaving the stencil on the card I then lightly sprinkled on some of the same Infusions and working from the centre of the flower outwards dragged my palette knife across each petal.


The flower stems were made by using the same stencil and adding a little of The Sage Infusions to the Grunge Paste.

I had a little of the Sunset Beach coloured Grunge Paste left so added this through another stencil ready for a spare card.


This too had Infusions sprinkled on the top and the palette knife dragged from the top to the bottom. I was amazed at how many different colours appear as the crystals tend to stay independent on the paste rather than mixing together when water is added.

The card was finished by stamping Wonderful in the top lefthand corner and die cut letters added. Threaded buttons attached to the flower centres and the card is finished.


I am really pleased with the effect this gives and it's one of those cards you have to touch!

I would like to enter this into PaperArtsy's blog Challenge titled Paints with Infusions
If you have 10mins to yourself make a cup of coffee and have a look at the fab examples the DT have prepared on the PaperArtsy Blog, great inspiration.

Well many thanks for stopping by and don't forget if you would like to win a set of the new 12 colours of Infusions pop over to The Craft Barn Blog and enter their blog candy before Sunday 19th March. Hope you all have a good week, weather looks not too bad for the next few days, take care and have yourself some much deserved "Crafting Time". Jane X


Monday, 6 March 2017

The Craft Barn Blog Candy

Hi everyone, there is a fantastic offer over on The Craft Barn Blog lasting until Sunday 19th March-- the lucky winner will receive the complete new set of 12 PaperArtsy Infusions. To take part click on the link Here.
If you are not familiar with the new colours here's a picture to whet your appetite.


These wonderful little bottles of water soluble dye colour pigment explode into colour when moisture is added in the form of spraying water, mixing with pastes, various glazes and mediums etc.
I'm off to make a Mother's Day card using infusions and grunge paste so pop back later to see how it turns out!
Bye for now and don't forget to get your name on the blog candy list. Jane X


Monday, 30 January 2017

Pink and Orange!!!

After going and seeing a wonderful exhibition at "Standen" National Trust last week on some of the designs by Kaffe Fassett I felt inspired by his eye for colour ------- could there be a link with the challenge over on The PaperArtsy Challenge this fortnight?


One of the fabulous pieces on display --- pink and orange figure quite strongly in many of this wall hangings.

Now I have to say they were never up there in my top 3 colour combinations before but now having had a play and seen how they make things 'Pop"out at you I'm definitely warming to them. So below is my entry for the first of 2017's PaperArtsy Challenges titled 'Pink and Orange'.


I began by painting my MDF heart with Very Berry and Autumn Fire. Then once dry added some Blush paint through Lin Browns stencil PS005.


This was then stamped with an image from Lynne Perrella's LPC010 in black ink and then heat embossed with clear embossing powder. The words were then added and these came from One Penny 4 stamp set. The edges were heat embossed with Stampendous Aged Silver . Finally a pink leather tie was added to the top.

That's all from me tonight as I've got some pink and orange ink calling me!!
Enjoy your week -- doesn't look as if it's going to be quite so cold the next few days, take care. 
Jane X


Thursday, 26 January 2017

The beginnings of my Art Journal


Welcome to my first blog entry on my newly started art journal. I have been thinking about making an art journal for a couple of years or more and over the Christmas holidays made myself a promise that 2017 would be when I'd begin. Although this is not the very first page of my journal ( that will appear on The Craft Barn Blog at the beginning of March ) this is the first time I've made an entry on my blog page.


I began by applying some Fresco paint in Mermaid with a brayer, then once dry added some distress inks through a Stencil Girl stencil.


More detail was added using a different stencil and 2 warm tones in distress inks. The bottom of the page was then stamped using a mix of Brilliance Pearlescent Olive and Ocean Depth ink and a stamp called Frise en Ribambelle by Carabelle Studio. 
Odd detail of colour was added to the stamped image using Distress Markers.


The flowers from PaperArtsy ZA08 a recent issue, were stamped onto white card that had been coloured with various Pan Pastels. These were then cut out and I played around for a time before deciding on their final position.

The fab sentiment was stamped in black Versafine ink and the flowers stamped onto the page. Before sticking the coloured flowers over the stamped images I added stems and a few dots and doodles with a fine black pen. 


Finally I painted a mini Tando Creative heart in Fresco Blush and drew on a smiley face!


Every time I read this message I have a little smile to myself ------ it's perfect.

Well now that I've begun my art journal and I must say have really enjoyed the time spent on the pages I will have to think seriously about making a scrap book for my 4 wonderful Grandchildren while I still remember who the elderly relatives are in the sepia photos!

Thank you for stopping by today, hopefully it won't be too long before the ground warms up a little and the 'Smiles' will start to appear. Enjoy the rest of your week and keep warm, bye for now.
 Jane x


Wednesday, 28 December 2016

Hi and welcome, I hope you all had a wonderful Christmas and are now enjoying a little rest and relaxation!!!! Perhaps you were lucky enough to receive some crafting goodies from Santa which can be experimented with.

The Christmas card pictured below was made using 2 of my favourite stamp sets one from Crafty Individuals and the other from PaperArtsy. If you would like to see the different stages of making this card I have included a link to The Craft Barn Blog where all will be revealed here.


I would just like to wish you all A Very Happy, Healthy and Peaceful New Year with lots of Craftyness added in. Take Care and see you all in 2017.
Jane x

Monday, 28 November 2016

"Bling It Up" Tag

Good evening and welcome, today I've been cracking on with some things ready for Christmas and thought I would share this tag with you. I would like to enter this for The Craft Barn 2 Weekly Challenge titled 'Bling it Up'.


Apart from adding the 'sparkley' bits the challenge also includes the colours purple, turquoise and green! I know turquoise and purple are often put together for Christmas decorations but the addition of green had me hooked.

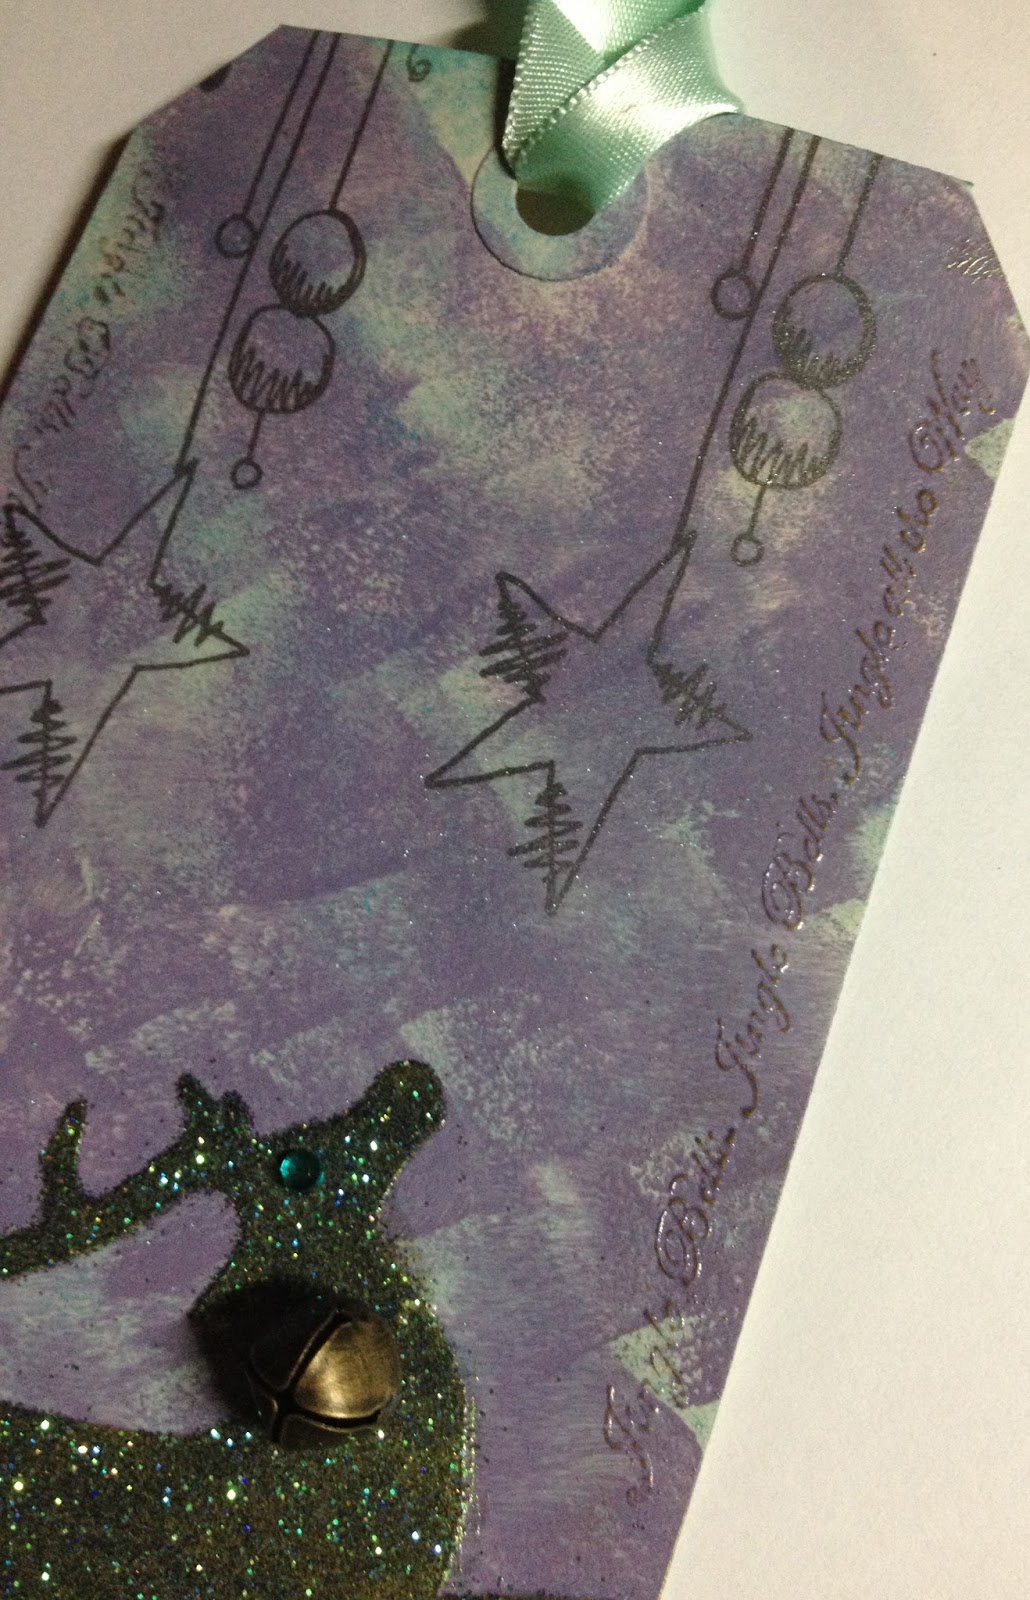
So to begin with I started with a large manilla tag and dabbed on some Fresco Chalk Acrylic in Pansy using a small piece of cut and dry. Then once this was completely dry added some Tumbled Glass DI using a blending tool.


Next I coloured some Dreamweaver Translucent Embossing Paste with a little Dreamweaver Metallic F/X in Kiwi. This was then spread through a reindeer stencil by Tando Creative. The stencil was removed, cleaned and replaced, then green glitter was added to the still wet reindeer.


I did not pile the glitter on too thick as I wanted the lighter green of the paste to show through in parts so as to vary the shades of green. Once dry a turquoise gem was added for an eye and a small bronze bell attached with invisible thread.


Then using just part of the main stamp from Jofy 06 the star and baubles were stamped in VersaMark ink and brushed with antique green Cosmic Shimmers Mica Powder and the sides of the tag were also stamped using the VersaMark ink and then clear heat embossed with 'Jingle bells'.


Finally a light turquoise/green ribbon was tied to the top. The shimmer on the hanging stars etc doesn't show that well in the photo but I am very pleased with the effect the reindeer has against the painted background.

If you are making some cards or other creations over the next few days give this colour combination a go and enter the Craft Barn Challenge and be in for a chance of winning a £10 voucher to spend on line in the shop.

Thanks for stopping by, hope you have a good week, take care and keep warm as it looks like it's going to be a "Chilly" one.  Jane X


Saturday, 15 October 2016

The Wicked Witches' Residence !

Hi, yesterday I had a fun time creating a 'Spooky' Halloween card which I would like to enter for The Creative Carte Blanche Challenge Witchy Woman and The Craft Barn 2 weekly Challenge Pumpkin and Bat.


I started by cutting 2 houses using Tim Holtz Rickety House die, one in spotty co-ordinations card and one from card that had been coloured with Fresco Chalk Acrylic paints.


Once I'd worked out which window went  where I sanded the black die cut house and rubbed areas with Treasure Pewter.

Next I stamped the bat, pumpkin, broom, and hat onto scrap card and clear embossed so as two make cutting out a little easier. These were coloured with Distress Makers and a silver Pro-Marker.

The banner was cut from kraft card using Tim Holtz Alterations Tattered Banners die and stamped with Wicked Witch and heat embossed in black.

The card blank was coloured using Distress inks in Weathered Wood, Stormy Sky and Pumice.
The cobwebs were added using pumice.


I don't normally make Halloween cards but I must admit this was fun to construct and I think the bat is quite evil!!

There is no visible witch in this project so I hope the Creative Carte Blanche will accept this entry.

Many thanks for stopping by, I hope your weekend is full of fun and relaxing things, maybe even some crafting!
Take Care, Jane X


Friday, 7 October 2016

Thrilling News----

Hi and welcome, today I am thrilled and excited to be able to tell you that I've been chosen to join The Craft Barn Blog Design Team. There was recently a post asking for people interested to apply and as I had been a customer of the shop at Lingfield and then Nutfield I felt a strong connection with the business which I wanted to continue.

We were having a couple of nights away in the camper van when I  found out I was one of the lucky 3 to be accepted and I was so chuffed and excited. A few days later the list of themes/topics arrived and I am now preparing various projects for the next couple of months.

My first sample was accepted and went out on the blog entry titled Alcohol Inks and Yupo.


To see how I made this card and a tag click here.

This weeks theme is Dimensional Crafting which I love, so had to add this to my chosen list. There have been 2 samples by other team members on the blog which are both very different and stunning. One is a gorgeous altered tin and the other a beautiful die-cut and stamped bird cage. 

To see these wonderful pieces grab a coffee and pop over to  The Craft Barn.

My entry will be posted tomorrow so to find out what I made with these embellishments please head over and have a peep.


Thank you as always for stopping by today and please do have a look at The Craft Barn's blog and maybe enter one of their 2 weekly challenges. See you soon and take care, Jane X.


Tuesday, 20 September 2016

Good evening and welcome, today after downloading some recent photos taken will we were away for a few nights in our camper van I found myself looking at this particular picture of a beautiful sunset.


The silhouette of the tree on the right made me think of a Crafty Individuals stamp set 367 ----- so off to the work bench I went.


The background was made using shaving foam and alcohol inks.


I printed off several pieces of card and tags for future use.

The image was then stamped in black Versa fine ink, cream lace attached underneath the image and some raspberry pink ribbon.


The wonderful sentiment from CI 410 was stamped in Brilliance Pearlescent Crimson onto a spare piece of white card then cut out using a die from Spellbinders ribbon banners LG. the edges were then lightly brushed with Seedless Preserves DI.


I was very pleased with the background and feel the colours gave the effect I was hoping to achieve.


I would like to enter this card for ;

The Craft Barn Challenge Around the House.
and
Crafty Individuals Challenge Clean and Simple.

Thank you for stopping by tonight, hope you have a good week and take care  Jane x