Well a very Happy Sunday to you all, hope you have better weather than us here in Kent where it is very grey and damp.

Today I thought I would explain how I colour ordinary printer/copier paper for making flowers and leaves for my cards and crafting projects like the ones in the photo.
If you are going out somewhere nice and want clean hands do this another day!!
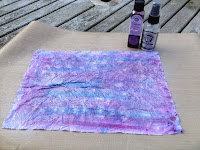
To start with you need just a sheet of ordinary copier paper which I spritzed with a little water just to prevent the inks drying immediately. Then I dragged over some Ranger Distress Stains, I started with Seedless Preserves.
Next spritz again with some water and add another colour, in this case I used Tumbled Glass and Salty Ocean. then spritz again with some water, I know it looks a mess but stick with it!
You can experiment with different colour combinations and get some amazing effects.

Now screw the paper up into a ball, if this is hard to do, spritz with a little more water. It should now look like the picture on the left. Next you need to carefully unravel the ball and lay it flat on your craft mat.
At this point if the paper is drying out just spritz again with a little more water, the more water you use the more the colours blend.
I then sprayed with Cosmic Shimmers Mist in Plum Twist and also Perfect Pearls Mist in Perfect Pearl and screw up in a ball again.
Now flatten out to dry, I usually leave this to air dry but if you are in a hurry you can use a heat gun.
You will notice the colours dry lighter than they first appear.
Once dry you are now ready to use however you wish, whether you die cut and layer your flowers or stamp with a design and then cut out by hand as in the picture. The paper has a lovely texture with all the wrinkles in it.
Here I stamped a second flower on a scrap of card and coloured the centre with pro markers , then brushed on some clear crackle paint and left to dry before cutting out and sticking in the centre.
Well I hope you have enjoyed reading this blog and will pop by another time, enjoy the rest of the weekend.
TTFN Jane x


No comments:
Post a Comment