Showing posts with label Treasure gold metallic wax finish.. Show all posts

Sunday, 28 August 2016

My Attempt at making the Leandra Bead!!

Hi and welcome, this fortnight over on the PaperArtsy Blog the challenge is 'Beads, Charms and Dangles'. There are lots of wonderful examples to whet your appetite, but it was the video of the Leandra bead that really inspired me to get out the Melt Pot --- ( which when the temperature outside has been in the 30's for the past few days is not normally the first craft I'd jump too!)


To make the beads I followed the video as best I could with what head pins, Utee etc that I had in the craft room stash.


The head pins were only 45mm and having had a go I would now buy some slightly larger ones.


To start with the pan only had clear Utee added but gradually as I popped the growing beads into various shades of blue EP lovely streaks appeared  adding extra pattern and design to the beads.


Then as the contents of the pot got a little muddy I added some Primary Apple Red, Ancient Copper Metallic and the tiniest spot of black. 


Oohh thats yummy! 


These 2 beads were shaped by pressing the round bead onto the sides of the melt pot.


As the Utee level was going down and making the covering of the beads more difficult I decided to pour the remaining contents onto the craft mat and inked up a rubber stamp with Archival Black ink and pressed it into the very hot, molten Utee.


Once cool the stamp was removed and I rubbed in some Treasure Gold in Ruby and Renaissance but ------- was not completely happy with the result so decided to cut my losses and got the heat gun out and melted the piece on the craft mat---(" Is she mad " I can hear you saying!) Well I was very pleased with the end result as the wax melted just on the top and gave a lovely marbled effect. I then very lightly added a little Pewter wax to hi-light the edges of the letters.


When I started to make these lovely Leandra beads I had no idea what I was going to use then for but was itching to make something ----

So I now have a pair of unique ear-rings
and


some lovely beads for future projects.

A big thank you to PaperArtsy for the very inspiring video and I'm now off to order some larger headpins and another pot of clear utee !
Hope you all have a great weekend and if you live in the UK enjoy the Bank Holiday if you're lucky enough not to be working. Bye for now and take care Jane x


Sunday, 27 March 2016

"Boxes Of All Sorts"

Hi, and A Very Happy Easter to you all. Today I finally got around to finishing my entry for Crafty Individuals March Challenge titled "Boxes of All Sorts".


I really don't know where this month has gone but it's certainly flown by --- to view the other beautiful entries and the fantastic DT samples click on the link here.

To begin with I started off with 2 basic components ;


an empty box of chocolates measuring 10cm x 10cm and a pack of Twiddleybitz inches.

The box was given a coat of black gesso all over and the inches were cut to size. 
The frame of the inches and the squares were given a coat of white gesso and then the frame was painted with fresco chalk paint in Slate. Once dry a layer of Americana weathered wood was applied, then a coat of Fresco Chalk paint in Stone. the inches were painted in Fresco Chalk paint in Evergreen, Lake Wanaka, Mermaid, Beach Hut and Inky Pool with a brayer.

The inches were stamped using CI 184 and white embossed and the frame had touches of Treasure Gold in Olive Bronze added to the edges.

A small black card tag was white embossed using 'For You' from CI 438.


I then attached some fancy thread to the edges from the back and tied some bakers twine through the tag.

The box had grunge paste applied through CI mask which once dry was coloured with DI in Victorian Velvet, Seedless Preserves, Bundled Sage, Shabby Shutters and Peeled Paint. A piece of scrap paper was placed in the centre of the mask so as not to colour the centre of the box.


Once this was dry Olive Bronze Treasure Gold was added to the foliage and dots of Liquid Pearls in Pewter were added to the centre of the flowers.

Some CI text ribbon was attached to the sides of the lid and the inches and frame were glued to the top.


I shall probably use this box as a present filled with homemade chocolate truffles.


Well I hope you enjoy what is left of the Easter break, and hopefully your weather is much better than what we have had here in Kent today. Take Care and have fun, Jane x.


Monday, 20 July 2015

Secret Poppy

After spending far too long on Pinterest the other evening, I was reminded of a technique I've not used for some time, so thinking cap on, off to the craft room I went and got the paint out.


I started with a piece of white card 10cm square and painted it with Fresco Chalk paint in slate. Once dry wiped it over with an anti-static bag and stamped the images in versa-mark and embossed with clear powder.


The stamps I used were all from Lavinia's range; secret garden, fuchsia, small path and the foliage stamp from the magazine freebie set.

Next I painted the whole piece again in a mix of Hint of Mint and Guacamole, then when just touch dry wiped it over with a piece of damp kitchen paper. This reveals the clear embossed art work underneath.


I had also stamped the gate on another piece of painted card so that I could open the gate and stick another one onto the back.


Various areas of the clear embossing were then lightly rubbed with treasure gold in ruby and olive bronze and also metallic lustre in black shimmer.

Then I stamped the poppy in black archival ink onto some shrink plastic, once dry turned the plastic over and coloured in the stamped image with Promarker pens. This was then cut out and heated.

In the opening of the gate I stuck a piece of lightly patterned paper then mounted the whole piece onto some glossy black card. 


I cut 4 corners from the same black card and then mounted the whole piece onto a burgundy coloured card. A black pearl gem was added to the gate to form a handle.


I would like to enter this into Lavinia Stamps challenge no 7 titled 'Add a Flower'. To view the DT's wonderful samples for this challenge click on the link here.


Thanks as always for stopping by, hope this might inspire you to get 'painty' too. Take care and have a great week, Jane x


Sunday, 23 November 2014

Altered Cheese Box !

Gosh if your day outside is anything like it is here in Kent there is only one thing for it and that is to stay in and play--- ( oops I mean be creative!).


Sometime ago I saved a wooden cheese box, having enjoyed the contents of course and left it outside on the garden table to allow it to release the now stale cheese aromas. As with so many items saved the thoughts were this must have a use, well this one will have.

The decoration 'sort of' follows on from my last blog entry as I really love the effects the shaving foam and acrylic paints made through a stencil.
To begin with the box was given a coat of white gesso all over-- top, bottom, sides etc. Then a coat of Toad Hall Fresco Chalk acrylic paint and once dry, which was very quick as the box absorbs the paint like a sponge, a coat of Americana Weathered Wood just on the lid, top and sides and the sides of the base. The top coat was then Guacamole in the Fresco Chalk mixed with Eco-Friendly Aged Silver acrylic. Once this had dried I then went over with a dry brush using Inky Pool translucent acrylic.

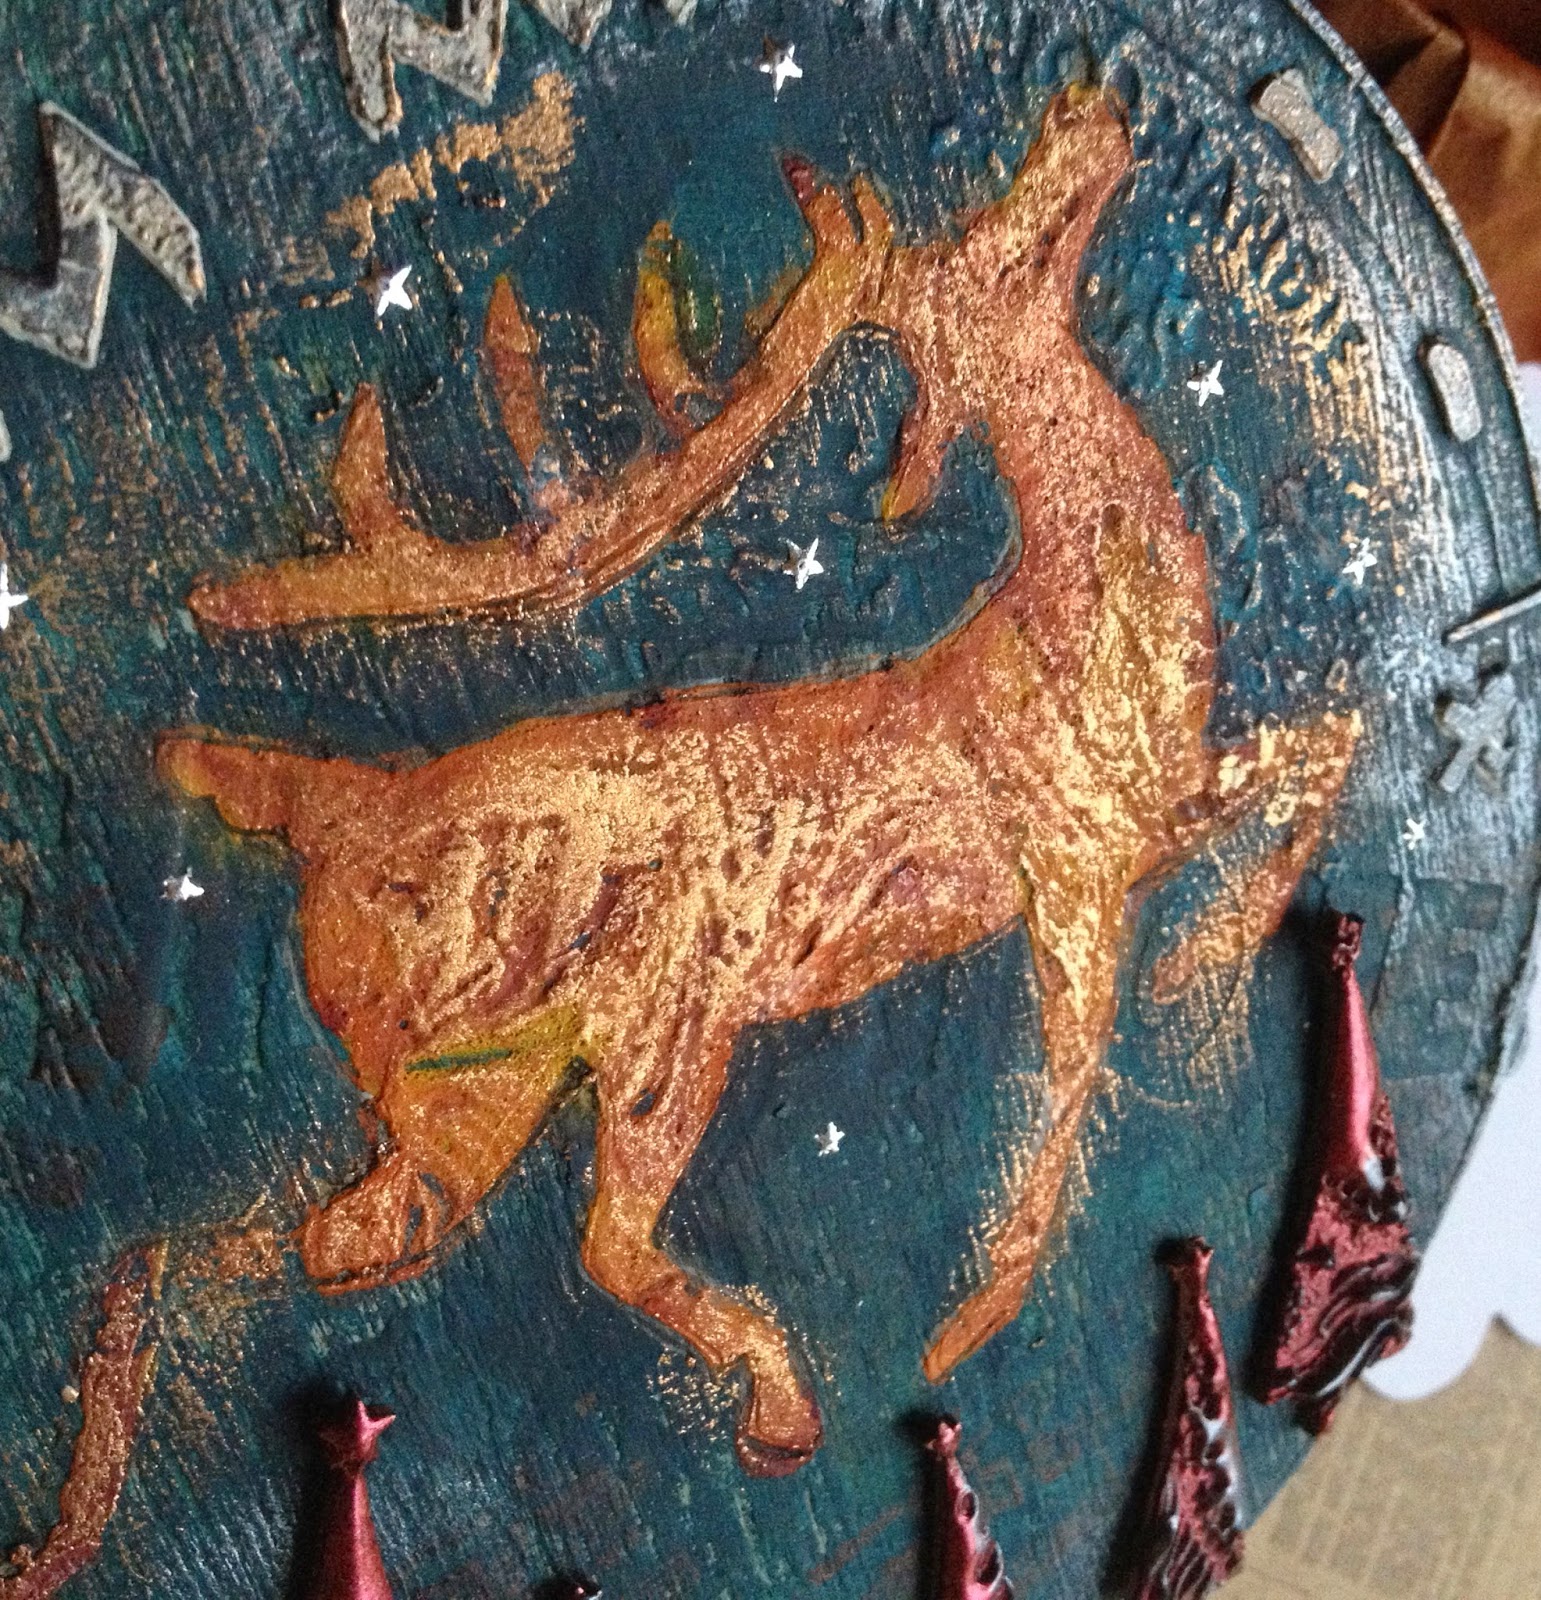
Then using the medium sized reindeer stencil from the Tando-Creative set of stencils and masks I spread a mix of the shaving foam with Autumn Fire, Pumpkin Soup and Claret Fresco Chalk paints. I also fancied a card to match.


Once the reindeer was completely dry I went around the outline of the reindeer on the box with a fine nibbed black pen.

Next I added touches of grunge paste through the Tando-Creative Stitches group mask around the top half of the lid above the reindeer. 

Around the rim of the lid I stencilled Christmas twice using Brilliance inks in Starlight Black and Ocean Depth.


I randomly stamped some music in black ink around the legs of the reindeer before decorating the Mini Wonky Trees also by Tando-Creative.
These were embossed twice with Cosmic Shimmers ultra thick Lave Black embossing crystals and then whilst the embossing crystals were still hot a stamp inked in black Archival was pushed into the molten plastic. Beware though not all makes of stamps will stand up to the heat !!!

Once cool and the stamp removed the raised edges were then rubbed with Decoart Metallic Lustre in Black Shimmer as were the grunge paste stitches on the lid. The trees were stuck onto the lid with pva glue.


The reindeer was lightly rubbed with Treasure Gold in Ruby and Renaissance and a few tiny silver stars were added in the sky.

The inside was lined with some copper coloured tissue paper.


The thoughts behind the box is to fill it with home made chocolate truffles for a christmas present.


And there's a matching card to go with the present.


The lovely marbling shows up better in the photo of the card than it does on the box, but unfortunately it doesn't pick up the slightly raised texture.

If you would like more details of the shaving foam and stencil technique pop over to my previous blog entry titled 'Playing with Fresco Chalk Acrylics and Shaving Foam'.

I would like to enter this into Tando-Creatives monthly Challenge titled "Something with a use".

Thanks for stopping by today  and a big thank you for all the wonderful comments - they really are appreciated. Hope you enjoy your day and hopefully have some time to do something 'Crafty'.
Take Care, Jane x


Sunday, 26 October 2014

Christmas Cards Inspired by Anneke De Clerck

Welcome and a very happy Sunday afternoon to you all. Today I would like to share a couple of Christmas cards I've made that were inspired by the PaperArtsy blog.


For the backgrounds I followed the technique used by Anneke De Clerck which you can read if you click on the link Here.


For this one I used Memory Box Alpha Worn Out stencil with PaperArtsy Chalk acrylics in Spanish Mulberry, Snowflake and Beach Hut.


Before attaching the background to the card I rubbed the edges with a little Treasure Gold in Sapphire and Pewter.


For the coloured star I stamped the large star from Jofy 07 in versa-mark and then white embossed onto card I'd previously coloured with Pan Pastels in Phthalo Blue shade, Magenta Extra Dark and Ultra Marine Blue. This was then cut out and given a coat of Distress Stickles Clear Rock Candy.


The white star was stamped in Adirondack in denim and clear embossed. This too was given a coat of clear rock candy after being cut out which in various places has made the ink bleed---- I must confess I rather like the distress look it gives.

The sentiment was also stamped in denim onto white card and clear embossed and then mounted onto some remains of the pan pastels coloured card. The ring was made from some coloured jewellery wire with a silver bell threaded at the top and then some blue ribbon attached.


Card no 2, for this I used Tim Holtz Measured stencil with PaperArtsy Chalk acrylics in Autumn Fire, Pumpkin Soup, Toad Hall and Guacamole.


I then added some Antique Linen Distress ink with a blending tool as I didn't like the stark white contrast of the card. This had Treasure Gold in Renaissance added to the edges.


The baubles were stamped using the same Jofy set as before, the white ones stamped in Tea dye distress ink and clear embossed and the coloured ones were from the Pan pastels coloured card in the Magenta extra dark, Ultra Marine Blue and Hansa Yellow Shade and white embossed.

Both lots were given a coat of PaperArtsy Fresco Finish Metallic Glaze. Small holes were then punched in the tops and cream coloured bakers twine attached. Gold coloured wire was used for the ring on this one. Merry Christmas was stamped and then gold embossed on white card.


I was very pleased with the end results and will use this technique again for backgrounds.


Plus as a bonus that's 2 christmas cards made!!!

Well the nights are drawing in now so that means for me it's more crafting time as I won't be gardening and watering. Thanks as always for stopping by today and I love to read your comments as I know how busy everyone is. Take care and I hope you all have a good week. Jane x


Saturday, 7 June 2014

Altered Frame


Today I am sharing the different stages of altering an old veneered frame that has had a small cross stitch sampler in it for about 25yrs. The frame was looking very tatty and the embroidery was in need of a wash so it seemed the perfect time to get to work on it.

I was inspired to alter this frame having read Sue Carrington's altered box on the Paperartsy Blog, to view this blog click on the link http://blog.paperartsy.co.uk/2014/06/altered-box-with-lynne-perrella-stamps.html


This is how the frame looked before I set to work on it, I stripped off the veneer and sanded the wood to remove any residue of glue. I then gave it a coat of French Roast, then a coat of Toad Hall followed by some small random areas of French Roast.


I then brushed some areas with Americana Weathered wood where I wanted a cracked effect and once this was dry added a coat of Mermaid all over. A light sanding was given to a couple of patches to reveal a little more of the under colours.

I then applied Grunge Paste through the Bird and Branch Stencil by Tando Creative to the bottom righthand corner. Next I spread a little Grunge Paste through some netting with my finger on 3 random spots.

Once this was dry I made a light wash with bundled sage Distress Stain and water to add a slight colour to the leaves and stems of the flowers. The flowers were coloured in the same way using seedless preserves Distress Stain. 

I applied some walnut stain Distress Ink to the edges of the frame and then randomly stamped the diamonds in Archival Watering Can, the trellis in walnut stain and the ' don't eat the daisies' in black soot Distress Ink.


I also did some stamping on the edges so as to tie it all together.


To finish the whole frame off I applied areas of Treasure Gold Wax in Olive Bronze and Sapphire and then buffed up with a soft cloth.


Now all that's left to do is press the cross stitch, place it back in the frame and hang it on the spare bedroom wall.

I would like to enter this for the PaperArtsy Weekly Challenge.

Today I went to the Craft Barn at Nutfield where they were hosting their yearly Extravaganza and Leandra Franich from PaperArtsy was demonstrating some wonderful background papers using the Fresco Chalk Acrylics, learnt some great techniques and if anyone is thinking of going along tomorrow I highly recommend it.

Thanks for stopping by and please feel free to leave any questions or comments at the bottom of the page. Hope you all have a great weekend, take care and hopefully see you back here soon Jane x