Showing posts with label Grunge Paste. Show all posts

Monday, 15 August 2016

'Dream' Tag

Hi, it's been a while since I last did a blog entry but with having a fab week in Cornwall, a few odd days out in the Campervan, lots of gardening and a wonderful few days in Ireland visiting our gorgeous Grandchildren there hasn't been an awful lot of spare time. Ooh and I forgot to mention -  the odd bit of crochet--------


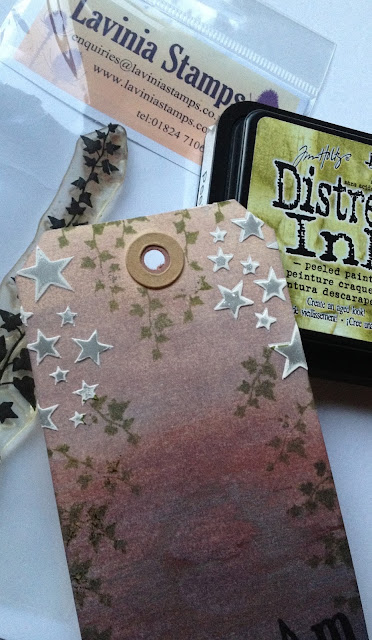
Anyway back to the job in hand! Over on the Creative Carte Blanche Blog their theme for August is Sun, Moon and /or Stars so here is my entry for this month.


I started with a large manilla tag which was coloured with various Pan Pastels, this was then lightly sprayed with Jackson's Pastel Fixative.


Next I stamped the shimmering moon by Clarity Stamps in VersaMark ink and rubbed the stamped image with Pewter Pan Pastels. 


Dream was then stamped underneath in Versafine Onyx Black and then clear heat embossed.


The stars were added using Grunge Paste through a That's Crafty Dinky Stencil, once dry lightly sanded and then the clean stencil was replaced and the stars coloured in the centres using Treasure Pewter wax.


The ivy was stamped using peeled Paint Distress Ink and a Lavinia Stamp. 

Recently we have had some beautiful sunsets and star lite skies and this gave me the colour tones to work with for this entry. Hope you are all enjoying the summer sunshine that we have been finally blessed with as up until now the summer has been rather dull --- so long may it last.

Enjoy the rest of the week and hopefully you too will find some free time to have a 'Play" and maybe join in the Creative Carte Blanche challenge. Bye for now,  Jane X


Sunday, 14 February 2016

Wax -- Now that's something new.

Hi, and a very happy Sunday afternoon to you. Today I've been inspired by the PaperArtsy blog, this their 3rd challenge of the year --Wax, which I have to say is a completely new medium for me. Leandra has put together some wonderful examples and the DT have produced some stunning pieces, so do pop over to their blog and have a peep http://blog.paperartsy.co.uk/2016/02/2016-topic-3-wax-challenge.html


I started by colouring my base heart with alcohol inks and then stamping in black archival ink using the text stamp from Studio 490 - Live and make art.


While this was drying I screwed up some tissue paper, added some distress stain to my craft mat and mopped up the remains of the alcohol inks with the distress stain.


I then gave the heart a coat of wax that had been melting in the melt pot. Once this was cool and set I then stencilled some slate Fresco paint to the righthand edge and sprinkled some aged silver EP. this was then gently heated with the heat gun to set the paint and to hold the EP granules in place.


Using LPC030 stamp set The face was stamped onto the coloured tissue and cut out. "Live Your Dream" was also stamped onto the tissue and the edges was torn.

Next using a Stencil Girl stencil by Michelle Ward I added stone paint through the stencil and then drew around the edge with a fine black pen. Grunge paste was added through the stencil in 2 areas and then once dry over stamped in black archival ink.

The ladies face was applied with melted wax as was live your dream. The little wooden frame had touches of slate paint added and then lightly rubbed with treasure gold in renaissance.

The heart was then given another thin coat of wax before adding treasure pewter to the edges. Once completely cooled the whole heart was buffed to make the beeswax shine.


This has been a difficult project to photograph due to the shine from the wax and the treasure gold but I hope you can get a fair idea of how this turned out.

The final coat and heating of wax slightly distorted the stencilled outline for the frame but I really like this effect --- a happy mistake, but would make that a feature on another project. 

This was my 'first toe in the water' for this medium but I will have to explore this in greater depth --(play again!).

I would like to enter this for 
PaperArty  - Topic 3 Wax
Creative Carte Blanche -  include something you've never done before. http://www.creativecarteblanche.com http://www.creativecarteblanche.com
Craft Barn - Heart

Thanks for stopping by today, hope you have a brilliant week whatever you may be doing, bye for now  Jane x


Sunday, 15 February 2015

Paint

Hello and welcome, I hope you are having a restful weekend and perhaps even spending a little time crafting in some way. Today Ive been messing around with paint after being inspired by the PaperArtsy blog --- it's their 3rd topic of the year titled Paint, to view Leandra's opening video click on the link here. This got my creative juices flowing and then I was nudged along by both Sue Carrington and Anneke De Clerck's colour combinations --- I wish I could be as bold with my palate!


I started with a piece of smooth white card the size of a DL card and attached some dry wall tape to the bottom and some grunge paste through a bird stencil.


Once dry I applied Fresco Chalk Acrylic paint starting at the top using the following colours; China and Snowflake then Pumpkin Soup, Tikka and Autumn Fire and finally Toad Hall, Evergreen and Guacamole. This was then knocked back using Snowflake and a dry brush.

The stencil was replaced over the birds and these were painted using Slate. I then randomly stamped the leaves from Flora and Fauna stamp set 3 in Snowflake.


Next I painted a piece of canvas and white card in a mix of Plum and Nougat using a circular motion.


Once dry the canvas was stamped in Versa-fine Black Onyx using the large tulip stamp from ELB03 and the small tulip stamp was stamped in Pumice Stone ink and then brushed with Perfect Pearls mica powder on the card. These were then cut out.


Using a darning needle I then frayed the edges slightly on the canvas tulip.

The leaves were then stamped onto white card using the same stamp set in Versa-magic sage and then over stamped in Bundled Sage to give a 3D appearance.


Using the fence stamp from Jofy 29 and Brushed Corduroy ink I stamped onto white card and then heat embossed with clear powder. Detail was added using the following paints; Toad Hall, Guacamole, Zesty Zing and Snowflake. The end of the card was painted with Beach Hut and Snowflake ready to stamp ' I just wanted to say' on from ECL01 in onyx black.


The picket fence was cut out with a craft knife and the sentiment was edged with a black pen and then over stamped using the same stamp as the background in 2nd generation Peeled Paint ink.

I then decide to mount the artwork onto some cardboard packaging which I painted in Merlin -- ooh yummy colour !


I used PVA glue to stick the card to the cardboard and then attached brads in the 4 corners.


The tulips, leaves etc were attached with Pinflair glue to obtain various depths and dimensions.


I was pleased with the different textures in this project.


And for me this was a bold colour scheme!

If you have a spare 5mins do pop over to the PaperArtsy blog and see the fantastic artwork the DT have produced.
I hope you have a good week whatever you may be doing, take care and thanks as always for stopping by, Jane x


Thursday, 27 March 2014

*DREAM* Mixed media Canvas


Well Todays entry is a mixed media canvas that I'm entering for the Sunday Stampers Challenge titled Dream. To see Hels Sheridans stunning example and all the other entrants click on the link   
There is a wonderful blog candy to be won this week as its her 300th anniversary.

Ok, so I had a little play time yesterday and I had been promising myself a messy session with some paint and stencils and this is what I produced. I will give a list of the paints, dies, stamps etc that I used and then a brief summary of how it was made.

ITEMS USED
Canvas measuring 5"x7"
Stamps by Graphic 45 and 7 Gypsies
Acrylic paint from PaperArtsy in Blush and Nougat
White Gesso
Tim Holtz Dies Fleurs di Lis & Eiffel Tower and Trellis from the new Frameworks series
Spellbinders Brackets Die
Stencils by Imagination Crafts called Bay Leaf and Dylusions Alphabet Border Small
Tag from InkyDoodles MDF Shapes Bag
Grunge Paste by PaperArtsy
Distress Inks in Iced Spruce and Vintage Photo
Distress Stains in Brushed Pewter, Tumbled Glass and Seedless Preserves
Brilliance ink pads in Graphite Black and Starlight Black
Perfect Pearls Mist in Blue Patina
Cosmic Shimmers Mist in Plum Tart
Creative Expressions Vintage Plum Gilding Wax
Cosmic Shimmers Mica Powder in Antique Blue
Treasured Gold Wax in Sapphire, Olive Bronze and Pewter
Decoart Metallic Lustre in Black Shimmer
Sizzix embossing folder
Paper scraps, lace, corrugated card, dry wall tape, black peel-off letters, hemp string, odd transfers, gems,2 eyelets and thin suede cord for hanging
The rose and leaves had been previously made and dipped into UTEE in the Melt Pot


To begin with I drilled the 2 holes in the top of the canvas and then gave it a coat of gesso. Then I stuck on the various papers, lace etc with a mix of 1part white glue and 1part water. Next using the grunge paste and stencils added the texture. This was then given a coat of gesso and then when this was dry a coat of blush acrylic paint.
The tag was also given a coat of gesso and a coat of blush. The letters were then stuck onto the tag and the edges stamped with iced spruce and brushed with the mica power. Finally the edges were sanded to reveal the wood.


Next a sprayed the canvas with the perfect pearls, the cosmic shimmers and a little water and tilted and twisted the canvas so that the colours mixed and blended between the different layers.

Once dry I then added the stamping to the canvas, Paris was first stamped in the starlight black and then over stamped in the graphite black to give some shadowing.

Making sure this was completely dry I then added extra colour using the Distress Stains. This was applied with a brush and my little finger! Touches of colour were also added to the die cut trellis so as to make it blend in rather than stand out too much.


The Eiffel Tower was embossed with the Sizzix folder and then rubbed with the sapphire treasured gold. The 2 brackets were rubbed with the black shimmer and all were buffed when dry.


The rose had some sapphire wax added to the edges of the petals and the leaves had some olive bronze added to the tips. These to were buffed when dry.

The ticket was given a coat of nougat and then stamped in the graphite black.


The canvas was then given touches of the vintage plum gilding wax and the pewter and sapphire treasured gold to the stencilled areas and the corrugated card to help make them stand out.

Then it was down to the assembling, after trying various designs, the transfers were applied before everything was secured in place with some pinflair glue. The gems were then added and the eyelet's were placed in the holes at the top and the suede cord threaded through and knots tied in each end.


A good evenings work I felt, little finger has a deep plum tone to it today but other than that there is no evidence of a messy, inky, painty session what so ever!!

I hope you can join me again soon for another crafty session, thanks as always for finding the time to stop by and read this blog. Any comments or questions are always appreciated and will be answered asap. Enjoy the rest of your week and take care, Jane x