Saturday, 16 April 2016

Resists on Backgrounds

Welcome, today I'd like to share with you a card I made using 'Resists' on the background before stamping the main image.


Over on the PaperArtsy Blog there is a wonderful array of examples put together by Darcy, so grab a coffee and click on the link here.

To begin with I cut a stencil using a die from Tim Holtz Alterations Thinlits - Mixed Media collection, covered it all over with versa mark ink and pressed the image down with a clean brayer on 2 opposite corners. These were then heat embossed with clear EP.

The card was then coloured using 2 paints from the Fresco Chalk collection with a brayer. Toad hall was applied first and once nearly dry the card was wiped with a slightly wet wipe to reveal the embossing.


Once the Beach hut was nearly dry I wiped away small areas of paint so the embossed pattern was now 2 colours.

Grunge Paste was applied through a stencil to give small areas of the harlequin pattern. I didn't like the stark white of the gaps in the paint or the grunge paste so applied some antique linen DI with a blending tool. The dry acrylic paint also acts as a resist.


The main image from LPC030 was stamped in versa fine black onyx and just before the ink was dry I sprinkled some clear EP on the pen nibs and heated. These were then touched with treasure gold in Olive Bronze.


The image was cut out, mounted onto cream card, then kraft card and the pen from the stamp set was stamped and embossed using the trimmings from the left hand side. ( really like how the diamond of grunge paste fits in with the design on the pen!)
The pen was cut out and rubbed with treasure pewter and then a twisted cord tied through the top.


Love the textures on this and the squares take on different appearances depending on the angle you hold the card, especially the faces.
Well I hope you all have a good weekend, weather forecast isn't brilliant, but there's always 'a bit of crafting' if it's too wet to go out! Have fun and take care, Jane x


Sunday, 27 March 2016

"Boxes Of All Sorts"

Hi, and A Very Happy Easter to you all. Today I finally got around to finishing my entry for Crafty Individuals March Challenge titled "Boxes of All Sorts".


I really don't know where this month has gone but it's certainly flown by --- to view the other beautiful entries and the fantastic DT samples click on the link here.

To begin with I started off with 2 basic components ;


an empty box of chocolates measuring 10cm x 10cm and a pack of Twiddleybitz inches.

The box was given a coat of black gesso all over and the inches were cut to size. 
The frame of the inches and the squares were given a coat of white gesso and then the frame was painted with fresco chalk paint in Slate. Once dry a layer of Americana weathered wood was applied, then a coat of Fresco Chalk paint in Stone. the inches were painted in Fresco Chalk paint in Evergreen, Lake Wanaka, Mermaid, Beach Hut and Inky Pool with a brayer.

The inches were stamped using CI 184 and white embossed and the frame had touches of Treasure Gold in Olive Bronze added to the edges.

A small black card tag was white embossed using 'For You' from CI 438.


I then attached some fancy thread to the edges from the back and tied some bakers twine through the tag.

The box had grunge paste applied through CI mask which once dry was coloured with DI in Victorian Velvet, Seedless Preserves, Bundled Sage, Shabby Shutters and Peeled Paint. A piece of scrap paper was placed in the centre of the mask so as not to colour the centre of the box.


Once this was dry Olive Bronze Treasure Gold was added to the foliage and dots of Liquid Pearls in Pewter were added to the centre of the flowers.

Some CI text ribbon was attached to the sides of the lid and the inches and frame were glued to the top.


I shall probably use this box as a present filled with homemade chocolate truffles.


Well I hope you enjoy what is left of the Easter break, and hopefully your weather is much better than what we have had here in Kent today. Take Care and have fun, Jane x.


Sunday, 13 March 2016

'Pru' the Art Doll


Good afternoon and welcome, today I would like to share with you the making of 'Pru', my first attempt at an art doll. Inspired by 2 challenges I would like to link her to;

  The Creative Carte Blanche  2 theme Metal, Lace and Corrugated Paper link here, and
 PaperArtsy's challenge Art Dolls link here. 
The video on the PaperArtsy blog was excellent and gave me the idea for construction.

To begin with I made a frame for the dolls skirt from wire and then attached this to a piece of wooden doweling which would become the centre part of the complete doll.


I stood this in a cotton reel while I was preparing everything, but managed to get Hubby to cut a block of hard wood and drill a hole in the centre for the completed Pru.

Next I painted several dictionary pages with the following colours of Fresco Chalk Paint; 
Chartreuse, Zesty Zing, beach Hut, Pumpkin Soup and Inky Pool.

 Then gave them a light spray with Perfect Pearls Mist in Blue Patina.
Once dry the pages were torn into strips along with some blue vellum and some white lacey Japanese paper and the skirt was then constructed using PVA glue. 


Then I made a template from some scrap paper to stamp the material through.


The centre flowers are from Jofy 12 and the leaves around the edges are from Flora and Fauna 3.
This was then embroidered and beads were also sown onto the flowers.

A corresponding heart was cut from another piece of fabric for the back of the body.


The face was stamped onto another piece of fabric using stamp set LPC 010.


This was lightly coloured using DI in tattered rose, trimmed to fit a small polystyrene ball and then the mauve felting wool was attached using a felting needle.

Now it's time to assemble the doll --- 
the 2 hearts were stitched together leaving a gap at the top and the bottom so that it could be threaded onto the doweling. Whilst stitching I added a small amount of toy stuffing and added a large pipe cleaner for the arms.


Wooden beads were threaded onto the pipe cleaner and the ends of the pipe cleaner were then threaded back into the centre of the bead forming a loop for the hands.
A metal charm was sewn onto the point of the heart.

A bow was made from some antiquey lace and attached to the back.
A metal cog was placed on the doweling before attaching the head. Wire and pearl beads were then added for a tiara. 


The book was made from a piece of stripped corrugated cardboard and the page was taken from a dictionary with the definition 'Art'.


You might be wondering why the name Pru ---- no particular reason other than when I was popping the head on that was the name that came to me!


She might not be as 'Quirky' as some Art Dolls but I had fun making her and she will sit in my craft room and keep me company while I create.

Now I'm away as the sun is shinning and I must do a bit of gardening. Thanks for stopping by and getting to know 'Pru'. Take care and have a good week whether it's working or 'playing' Jane x


Sunday, 14 February 2016

Wax -- Now that's something new.

Hi, and a very happy Sunday afternoon to you. Today I've been inspired by the PaperArtsy blog, this their 3rd challenge of the year --Wax, which I have to say is a completely new medium for me. Leandra has put together some wonderful examples and the DT have produced some stunning pieces, so do pop over to their blog and have a peep http://blog.paperartsy.co.uk/2016/02/2016-topic-3-wax-challenge.html


I started by colouring my base heart with alcohol inks and then stamping in black archival ink using the text stamp from Studio 490 - Live and make art.


While this was drying I screwed up some tissue paper, added some distress stain to my craft mat and mopped up the remains of the alcohol inks with the distress stain.


I then gave the heart a coat of wax that had been melting in the melt pot. Once this was cool and set I then stencilled some slate Fresco paint to the righthand edge and sprinkled some aged silver EP. this was then gently heated with the heat gun to set the paint and to hold the EP granules in place.


Using LPC030 stamp set The face was stamped onto the coloured tissue and cut out. "Live Your Dream" was also stamped onto the tissue and the edges was torn.

Next using a Stencil Girl stencil by Michelle Ward I added stone paint through the stencil and then drew around the edge with a fine black pen. Grunge paste was added through the stencil in 2 areas and then once dry over stamped in black archival ink.

The ladies face was applied with melted wax as was live your dream. The little wooden frame had touches of slate paint added and then lightly rubbed with treasure gold in renaissance.

The heart was then given another thin coat of wax before adding treasure pewter to the edges. Once completely cooled the whole heart was buffed to make the beeswax shine.


This has been a difficult project to photograph due to the shine from the wax and the treasure gold but I hope you can get a fair idea of how this turned out.

The final coat and heating of wax slightly distorted the stencilled outline for the frame but I really like this effect --- a happy mistake, but would make that a feature on another project. 

This was my 'first toe in the water' for this medium but I will have to explore this in greater depth --(play again!).

I would like to enter this for 
PaperArty  - Topic 3 Wax
Creative Carte Blanche -  include something you've never done before. http://www.creativecarteblanche.com http://www.creativecarteblanche.com
Craft Barn - Heart

Thanks for stopping by today, hope you have a brilliant week whatever you may be doing, bye for now  Jane x


Sunday, 31 January 2016

Oooow Yummy, Scrummy Hearts!

Over on the PaperArtsy Blog their challenge at the moment is 'Hearts' ------  and if you have read any of my previous blogs you will realise I'm partial to the odd heart so I had to make something to enter.


To see the wonderful collection of different hearts Leandra has put together and all the inspiration of the DT click here.

On Friday the postman delivered an order I'd placed with a firm called Artcuts who sell wooden cut shapes, words etc. The timing was perfect as in my order there was a box of 'Not Quite Perfect' items which consisted of may beautiful shapes including lots of hearts!


I was thrilled with my order and if you too use wooden shapes you might like to look on their site

So equipped with my base I was off.


The 12cm base needed a slight sanding on one side then it was given a coat of White gesso. Dry wall tape was added to the lefthand side and the definition of Home was torn from an old dictionary and struck on the righthand side.

Next I brayered some Fresco Chalk Acrylic in Haystack, Hint of Mint and Nougat. Grunge paste was added through a Clarity stencil, and once dry these were dry brushed with London Bus. The ivy was stamped to the edges using DI in Peeled Paint and then using clear EP heat embossed.


Then using stamp sets Crowns and Castles 2 & 9 and Archival Watering Can ink stamped images onto tissue paper and coloured in with water colour pencils.

The hinges were stamped onto shrink plastic with black archival ink and when dry coloured from the back with a gold Pro-marker pen. One hinge shrunk a little on the wonky side( probably my uneven cutting out) but I like the quirkiness it adds.

Using kraft card and Jofy 42 'Home is where the Heart is' was stamped and white embossed, then cut out and each of the 3 pieces edged with a black pen.

Treasure Gold was added to the hearts in ruby and olive bronze on the ivy leaves.

A length of rusty floristry wire was attached to the top and a carved wooden bead wooden.


Then all the elements were attached with either matt medium or Pinflair glue.


The material heart was simply made by cutting a paper shape for a pattern, embroidering 'Love' onto a piece of 16count Aida and sewing this onto the front of the heart along with the ribbon before sewing the back and front together leaving a small gap for the stuffing. Once stuffed the gap was sewn up.

If there was more time in the day and more space on my walls in my craft room I would make many more hearts of all shapes,sizes and materials but alas there's not !

Thanks for taking the time to read this blog, I hope you have a relaxing Sunday afternoon---- perhaps making something 'Heart Shaped' Have a good week,  Jane X


Sunday, 24 January 2016

!st for 2016 --- Lace, Buttons, Bits and Bobs.

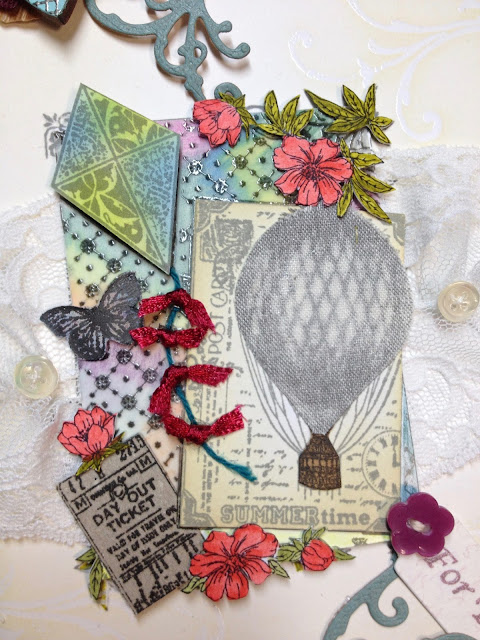
Hi and welcome, gosh it's already 24th January and I've only just got round to doing my 1st blog entry for 2016 !!! and what could be a better way to start than an entry for Crafty Individuals bi-monthly challenge. To view the DTs samples and the other wonderful entries click on the link here.


For this I started by stamping C.I. 386 onto various different card stock, vellum and calico. The vellum was coloured from the back using watercolored pencils.


The different elements were cut out and then gradually rearranged to reform the stamped image. A piece of crochet cotton and ribbons were used for the kite's tail, and a little Treasure pewter was added to the material of the balloon.

Then using C.I.182 the corners of the blank card were stamped in Versa-mark and clear embossed. The card was then inked with DI in Antique Linen using a large brush.

A small MDF heart was given 2 coats of Fresco paint in Mermaid and then stamped and embossed using pewter EP.

'For You' was stamped from C.I.438 set onto a tiny tag, a flower die was used to cut soft leather and crunchy wax kraft paper for the top and a single swirl was cut using the Elegant Swirl die and then cut in 2 so as to connect the top through to the bottom of the card.


Buttons, lace and a pearl bead were all added as the card was assembled. Although this wasn't the quickest card in the world to make as there was quite a large amount of cutting out, it was fun and very relaxing. I am pleased with how it has turned out and I feel it full fills the brief of 'Butons, Lace, Bits and Bobs'.

Thank you for stopping by and I hope this might get you looking in your button box and having a go.Take care and I hope you all have a good week, Jane X

Thank-you to all that left such lovely comments in 2015, they were all very much appreciated X


Sunday, 29 November 2015

Christmas Cards using Masterboards

Hi, I hope your weekend has been going well, this afternoon I've been making some christmas cards using masterboards as a basis to work from. Over on the PaperArtsy Blog there is a brilliant video by Leandra showing how to create a masterboard and some wonderful examples on how to use them, to view the video etc click here.


For these I made 2 different colour combinations but still have plenty left to use on other projects.


The paints used for my first board are ; Evergreen, Toad Hall, Guacamole, London Bus, Inky Pool, Snowflake and a little Pewter to finish. These were all applied with a brayer.


I then stamped text from ESN 03 in archival watering, the hanging star from Jofy 06 in archival jet black and finally the swirl from Special Christmas plate 3 in snowflake paint.


For my second board the following colours were used; China, Lake Wanaka, Beach Hut, Claret, Stone, Autumn Fire and Snowflake.


Then the design was created using T.H. Holiday Knit stencil with stone paint, the lines from Jofy 07 stamped in archival cornflower, noel from special christmas plate in archival watering can and finally the rings from HP1004 in snowflake paint.


For my first card I stamped the bunting from Jofy 07 onto my master board in versa-mark and white heat embossed.


This was cut out and the tassels were hi-lighted with a little Treasure Pewter.


The trees were stamped from the special christmas plate 3 and also white embossed. Stars were punched from trimmings after cutting out the trees.

I used the edging stamp from Jofy 06 for the bottom edge of the card.


For my second card I cut a piece of the master board and mounted it onto some burgundy coloured card. The star was stamped from Jofy 07 onto some kraft card , white embossed, cut out and then some Treasure Pewter was added. The white flower/tree from Jofy 38 was white embossed and then some glitter added. The MDF star was given 2 coats of gold embossing powder.


My final card which is my favourite out of the 3 repeats some of the 2nd card but uses the large flower from Jofy 38 ( which was one of my gifts from winning the blog challenge a few weeks ago and I love!) this was embossed using a clear glitter embossing powder and then hi-lighting with treasure Gold in Renaissance.


Bows, buttons, wire and hearts were added for detail but I felt they were all fairly quick and easy to make as it is sometimes too easy to get engrossed in making christmas cards and the time just vanishes. The next thing you know it's the last day for posting!!!

And on that note I shall away--- many thanks to PaperArtsy for the nudge into master boards, much appreciated. Hope you enjoy what is left of the weekend and many thanks for stopping by. Take care and all comments are much appreciated, Jane x