Showing posts with label PaperArtsy Fresco Chalk Acrylics. Show all posts

Thursday, 26 January 2017

The beginnings of my Art Journal


Welcome to my first blog entry on my newly started art journal. I have been thinking about making an art journal for a couple of years or more and over the Christmas holidays made myself a promise that 2017 would be when I'd begin. Although this is not the very first page of my journal ( that will appear on The Craft Barn Blog at the beginning of March ) this is the first time I've made an entry on my blog page.


I began by applying some Fresco paint in Mermaid with a brayer, then once dry added some distress inks through a Stencil Girl stencil.


More detail was added using a different stencil and 2 warm tones in distress inks. The bottom of the page was then stamped using a mix of Brilliance Pearlescent Olive and Ocean Depth ink and a stamp called Frise en Ribambelle by Carabelle Studio. 
Odd detail of colour was added to the stamped image using Distress Markers.


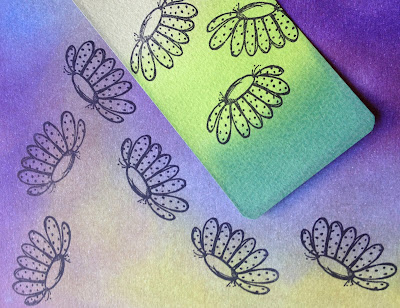
The flowers from PaperArtsy ZA08 a recent issue, were stamped onto white card that had been coloured with various Pan Pastels. These were then cut out and I played around for a time before deciding on their final position.

The fab sentiment was stamped in black Versafine ink and the flowers stamped onto the page. Before sticking the coloured flowers over the stamped images I added stems and a few dots and doodles with a fine black pen. 


Finally I painted a mini Tando Creative heart in Fresco Blush and drew on a smiley face!


Every time I read this message I have a little smile to myself ------ it's perfect.

Well now that I've begun my art journal and I must say have really enjoyed the time spent on the pages I will have to think seriously about making a scrap book for my 4 wonderful Grandchildren while I still remember who the elderly relatives are in the sepia photos!

Thank you for stopping by today, hopefully it won't be too long before the ground warms up a little and the 'Smiles' will start to appear. Enjoy the rest of your week and keep warm, bye for now.
 Jane x


Monday, 28 November 2016

"Bling It Up" Tag

Good evening and welcome, today I've been cracking on with some things ready for Christmas and thought I would share this tag with you. I would like to enter this for The Craft Barn 2 Weekly Challenge titled 'Bling it Up'.


Apart from adding the 'sparkley' bits the challenge also includes the colours purple, turquoise and green! I know turquoise and purple are often put together for Christmas decorations but the addition of green had me hooked.

So to begin with I started with a large manilla tag and dabbed on some Fresco Chalk Acrylic in Pansy using a small piece of cut and dry. Then once this was completely dry added some Tumbled Glass DI using a blending tool.


Next I coloured some Dreamweaver Translucent Embossing Paste with a little Dreamweaver Metallic F/X in Kiwi. This was then spread through a reindeer stencil by Tando Creative. The stencil was removed, cleaned and replaced, then green glitter was added to the still wet reindeer.


I did not pile the glitter on too thick as I wanted the lighter green of the paste to show through in parts so as to vary the shades of green. Once dry a turquoise gem was added for an eye and a small bronze bell attached with invisible thread.


Then using just part of the main stamp from Jofy 06 the star and baubles were stamped in VersaMark ink and brushed with antique green Cosmic Shimmers Mica Powder and the sides of the tag were also stamped using the VersaMark ink and then clear heat embossed with 'Jingle bells'.


Finally a light turquoise/green ribbon was tied to the top. The shimmer on the hanging stars etc doesn't show that well in the photo but I am very pleased with the effect the reindeer has against the painted background.

If you are making some cards or other creations over the next few days give this colour combination a go and enter the Craft Barn Challenge and be in for a chance of winning a £10 voucher to spend on line in the shop.

Thanks for stopping by, hope you have a good week, take care and keep warm as it looks like it's going to be a "Chilly" one.  Jane X


Saturday, 18 June 2016

"If I Had Wings" !

Over on the Creative Carte Blanche blog this month the team are challenging us with a theme titled "Winged Things"which after much thought about fairies, bees, dragonflies, etc, etc I came up with the following tag.


If you have 10 mins do click on the link here and browse through the DT's samples and the other entrants.

I began by painting a large manilla tag with fresco chalk acrylic in Space Cadet, then a coat of Americana Weathered wood and then once dry a top coat of Vanilla paint.
The edges of the tag were then distressed with vintage photo and peeled paint DI.

Below is a photo of the main items used.


Next I stencilled on the roof tops with walnut stain ink and hi-lighted the edges with a fine black pen.

The boy in flight was stamped in verso fine black onyx and embossed with clear powder. The area around the boy was then lightly touched with Treasure Pewter to give the impression of movement.


A cluster of stars were added to the top using a small stencil with scattered straw ink and then brushed with perfect pearls for a light shimmer.


If I had wings was stamped in Archival cornflower blue ink and then clear embossed.

The journey token was from Tim Holtz idea-ology muse token set.


The light was shinning on the embossed parts which made taking photos a little difficult but I hope you can decipher the different textures etc.

Another great challenge ladies, it's great to be able to rummage through ones stash of crafting goodies without worrying about which company or make each item is from -- thanks.

Hope you all have a good weekend and that the sun may shine on you, as here in Kent it's been Very grey and Very wet for far too long! Take care and many thanks for stopping by today, Jane x


Thursday, 19 May 2016

Welcome to the House that Nature's got a grip on!

Hi, today I have completed a wooden house that I've been constructing for the Creative Carte Blanche
May Blog Challenge --- titled 'Wood, Word and somethingWild'. Now from the off I knew I wanted to make a wooden house but as I progressed the design gradually altered, 'the creative journey'!

To begin with I rummaged in the shed for some wood off cuts and set to sawing my pieces for construction.


The body of the house measures 10cm x 11.5cm x 4cm and was sanded well and given a coat of white gesso as was the roof.


The roof was then given a coat of titanium white acrylic paint before stencilling the tiles through a Michelle Ward stencil.

The house was painted with Fresco Chalk acrylic paint in Space Cadet, lightly sanded and then given a coat of Stone paint and sanded again.
The windows and door were painted free hand using the titanium white.


Then on one side I stamped a tree from Jofy 29 stamp set and clear heat embossed. This was then coloured in and the grass stamped at the bottom.

Up until this point the plan was a cottagey type house with bunting above the door with the letters Home on and the back of the cottage was going to have a stamped wild meadow,  hmmmm?

Then I went outside to water the plants in the greenhouse saw some dried dead moss on the brick path and hey presto!!!


The ivy was stamped using various DI's and odd patches were clear heat embossed and touches of Treasure gold in Olive Bronze added.

My work bench got messier and messier!


The birds nest was made from dried ivy roots and the bird stamped from Clarity Garden set. The Welcome sign was die cut and tied using invisible thread.


I cut a wooden bench from a piece of old trellis fence that had started to decay. Twigs , dried old leaves, roots etc were added.


A flower pot stamped, coloured and cut out was added.


A brad for the door handle, smudges of pumice stone, walnut stain and peeled paint DI rubbed into the door and finally some fake moss from Hubby's model railway scenery stash was added to the chimney and roof.


Welcome to my Wooden house that the Wild has begin to reclaim.

Thanks for stopping by today, I hope you enjoyed my creative trip down natures path.

 Take Care, Jane x


Saturday, 16 April 2016

Resists on Backgrounds

Welcome, today I'd like to share with you a card I made using 'Resists' on the background before stamping the main image.


Over on the PaperArtsy Blog there is a wonderful array of examples put together by Darcy, so grab a coffee and click on the link here.

To begin with I cut a stencil using a die from Tim Holtz Alterations Thinlits - Mixed Media collection, covered it all over with versa mark ink and pressed the image down with a clean brayer on 2 opposite corners. These were then heat embossed with clear EP.

The card was then coloured using 2 paints from the Fresco Chalk collection with a brayer. Toad hall was applied first and once nearly dry the card was wiped with a slightly wet wipe to reveal the embossing.


Once the Beach hut was nearly dry I wiped away small areas of paint so the embossed pattern was now 2 colours.

Grunge Paste was applied through a stencil to give small areas of the harlequin pattern. I didn't like the stark white of the gaps in the paint or the grunge paste so applied some antique linen DI with a blending tool. The dry acrylic paint also acts as a resist.


The main image from LPC030 was stamped in versa fine black onyx and just before the ink was dry I sprinkled some clear EP on the pen nibs and heated. These were then touched with treasure gold in Olive Bronze.


The image was cut out, mounted onto cream card, then kraft card and the pen from the stamp set was stamped and embossed using the trimmings from the left hand side. ( really like how the diamond of grunge paste fits in with the design on the pen!)
The pen was cut out and rubbed with treasure pewter and then a twisted cord tied through the top.


Love the textures on this and the squares take on different appearances depending on the angle you hold the card, especially the faces.
Well I hope you all have a good weekend, weather forecast isn't brilliant, but there's always 'a bit of crafting' if it's too wet to go out! Have fun and take care, Jane x


Sunday, 29 November 2015

Christmas Cards using Masterboards

Hi, I hope your weekend has been going well, this afternoon I've been making some christmas cards using masterboards as a basis to work from. Over on the PaperArtsy Blog there is a brilliant video by Leandra showing how to create a masterboard and some wonderful examples on how to use them, to view the video etc click here.


For these I made 2 different colour combinations but still have plenty left to use on other projects.


The paints used for my first board are ; Evergreen, Toad Hall, Guacamole, London Bus, Inky Pool, Snowflake and a little Pewter to finish. These were all applied with a brayer.


I then stamped text from ESN 03 in archival watering, the hanging star from Jofy 06 in archival jet black and finally the swirl from Special Christmas plate 3 in snowflake paint.


For my second board the following colours were used; China, Lake Wanaka, Beach Hut, Claret, Stone, Autumn Fire and Snowflake.


Then the design was created using T.H. Holiday Knit stencil with stone paint, the lines from Jofy 07 stamped in archival cornflower, noel from special christmas plate in archival watering can and finally the rings from HP1004 in snowflake paint.


For my first card I stamped the bunting from Jofy 07 onto my master board in versa-mark and white heat embossed.


This was cut out and the tassels were hi-lighted with a little Treasure Pewter.


The trees were stamped from the special christmas plate 3 and also white embossed. Stars were punched from trimmings after cutting out the trees.

I used the edging stamp from Jofy 06 for the bottom edge of the card.


For my second card I cut a piece of the master board and mounted it onto some burgundy coloured card. The star was stamped from Jofy 07 onto some kraft card , white embossed, cut out and then some Treasure Pewter was added. The white flower/tree from Jofy 38 was white embossed and then some glitter added. The MDF star was given 2 coats of gold embossing powder.


My final card which is my favourite out of the 3 repeats some of the 2nd card but uses the large flower from Jofy 38 ( which was one of my gifts from winning the blog challenge a few weeks ago and I love!) this was embossed using a clear glitter embossing powder and then hi-lighting with treasure Gold in Renaissance.


Bows, buttons, wire and hearts were added for detail but I felt they were all fairly quick and easy to make as it is sometimes too easy to get engrossed in making christmas cards and the time just vanishes. The next thing you know it's the last day for posting!!!

And on that note I shall away--- many thanks to PaperArtsy for the nudge into master boards, much appreciated. Hope you enjoy what is left of the weekend and many thanks for stopping by. Take care and all comments are much appreciated, Jane x


Tuesday, 18 August 2015

Exploring Gels and Mediums

Hi everyone, hope alls well with you. Today I'm going to share with you my first time of using Golden Heavy Gel Gloss and also Studio Multi-Medium Gloss. I have have a small pot of each for several months but didn't really know much about their qualities or uses, so when PaperArtsy introduced their fortnightly challenge titled 'Gels and Mediums' my ears pricked up.
To view some great videos and samples click on the link to take you straight to their blog here.


I was really inspired by Lin Browns makes using the gels and pastes through stencils so it was off for an inky, painty session.

First  I started with spreading the heavy gel-gloss through Imagination Crafts Wisteria stencil and grunge paste through Clarity's Poppy stencil. Once dry I started the spraying process using watered down Fresco Chalk Spanish Mulberry in a spritzer bottle and Cosmic Shimmer Mist in Antique Green and Twilight black.


This I did in 3 layers gradually building up the colour and texture.


On the final layer I also sprayed Perfect Pearls Mist in Blue Patina.


Areas were hi-lighted with Treasure Gold in Sapphire and Renaissance.


Not easy to photograph but I love the smooth glossy texture of this gel.

Now back to the poppies. I started by giving them a spray with C.S.M. in Plum Twist.


I was surprised at how this absorbed the colour compared to the gel. Then I replaced the cleaned stencil and added some Studio Multi-med gloss to some of the petals. Once dry continued building up the layers with Plum Twist, Lava Red and Marigold.


The slightly darker petals are where the multi-med gloss is.


On the top of the tag I added a little Americana Staining and Antiquing Medium with my finger to smudge the micas together. Artful Blooms was stamped and white embossed.


Treasure Gold in Olive Bronze was added to the stems and leaves.

Ok now I'm hooked so I went onto making a 3rd tag!


This time I used Dreamweaver Translucent Embossing Paste through Tim Holtz Holiday Knits stencil. This took the longest to dry. I added colour with a brush and my finger with the staining medium mixed with Fresco Chalk paints in Tikka, Chutney, Pea Coat and Evergreen.


I love how the paints blend in when mixed with a medium.


To finish I made a mix of 50/50 of Satin Glaze and Metallic Glaze but only added this to small areas as I wanted some parts to still be matt.

Well I've had great fun and also learnt loads about these products so a massive thanks to Leandra and all at PaperArtsy for this great topic.
Thanks as always for stopping by and I hope you all have a great week. Take Care Jane x