Showing posts with label Distress inks.. Show all posts

Sunday, 4 September 2016

Stamping onto Linen

Hi, today I had a spare hour or so and thought I should really make a couple of cards ready for general birthday/greetings because the nearer it gets to shhh - 'Christmas' -- eek the harder it is to get anywhere near my work bench!
So here's my 2 cards which I would also like to enter for the Crafty Individuals bi-monthly challenge titled 'Clean and Simple'.


I started by lightly colouring a small off cut of white linen with distress inks and a brush and then stamped the image in the centre.


I did the same with another piece of linen but using different colours and a different image.


Next I trimmed the material and frayed the edges.


The edges of my card blanks were lightly coloured using the same distress inks that I had used on the linen.

I then cut some kraft card slightly larger than the pieces of material and distressed the edges before using as a mount for my stamped images.


I added a blue bead and some stitching, stamped the sentiment in Archival Cornflower and then added the lines with a very fine black pen.


The body of the butterfly had 8 or 9 very small beads threaded on some black cotton and then added 4 running stitches on each antenna.


The sentiment and 4 corners were stamped using Brilliance pearlescent olive ink. All the stamps were  by Crafty Individuals.

I was surprised at how quick these cards were to make as so often I think something will just take 30mins and it ends up taking a couple of hours or more!

I am pleased with the clean appearance of the finished cards and hope this fills the brief of Crafty Individuals Challenge.

Thank you as always for popping by today, all your comments are very much appreciated, take care and have a good week, Jane. X


Thursday, 19 May 2016

Welcome to the House that Nature's got a grip on!

Hi, today I have completed a wooden house that I've been constructing for the Creative Carte Blanche
May Blog Challenge --- titled 'Wood, Word and somethingWild'. Now from the off I knew I wanted to make a wooden house but as I progressed the design gradually altered, 'the creative journey'!

To begin with I rummaged in the shed for some wood off cuts and set to sawing my pieces for construction.


The body of the house measures 10cm x 11.5cm x 4cm and was sanded well and given a coat of white gesso as was the roof.


The roof was then given a coat of titanium white acrylic paint before stencilling the tiles through a Michelle Ward stencil.

The house was painted with Fresco Chalk acrylic paint in Space Cadet, lightly sanded and then given a coat of Stone paint and sanded again.
The windows and door were painted free hand using the titanium white.


Then on one side I stamped a tree from Jofy 29 stamp set and clear heat embossed. This was then coloured in and the grass stamped at the bottom.

Up until this point the plan was a cottagey type house with bunting above the door with the letters Home on and the back of the cottage was going to have a stamped wild meadow,  hmmmm?

Then I went outside to water the plants in the greenhouse saw some dried dead moss on the brick path and hey presto!!!


The ivy was stamped using various DI's and odd patches were clear heat embossed and touches of Treasure gold in Olive Bronze added.

My work bench got messier and messier!


The birds nest was made from dried ivy roots and the bird stamped from Clarity Garden set. The Welcome sign was die cut and tied using invisible thread.


I cut a wooden bench from a piece of old trellis fence that had started to decay. Twigs , dried old leaves, roots etc were added.


A flower pot stamped, coloured and cut out was added.


A brad for the door handle, smudges of pumice stone, walnut stain and peeled paint DI rubbed into the door and finally some fake moss from Hubby's model railway scenery stash was added to the chimney and roof.


Welcome to my Wooden house that the Wild has begin to reclaim.

Thanks for stopping by today, I hope you enjoyed my creative trip down natures path.

 Take Care, Jane x


Friday, 23 May 2014

Playing With Inkabilities

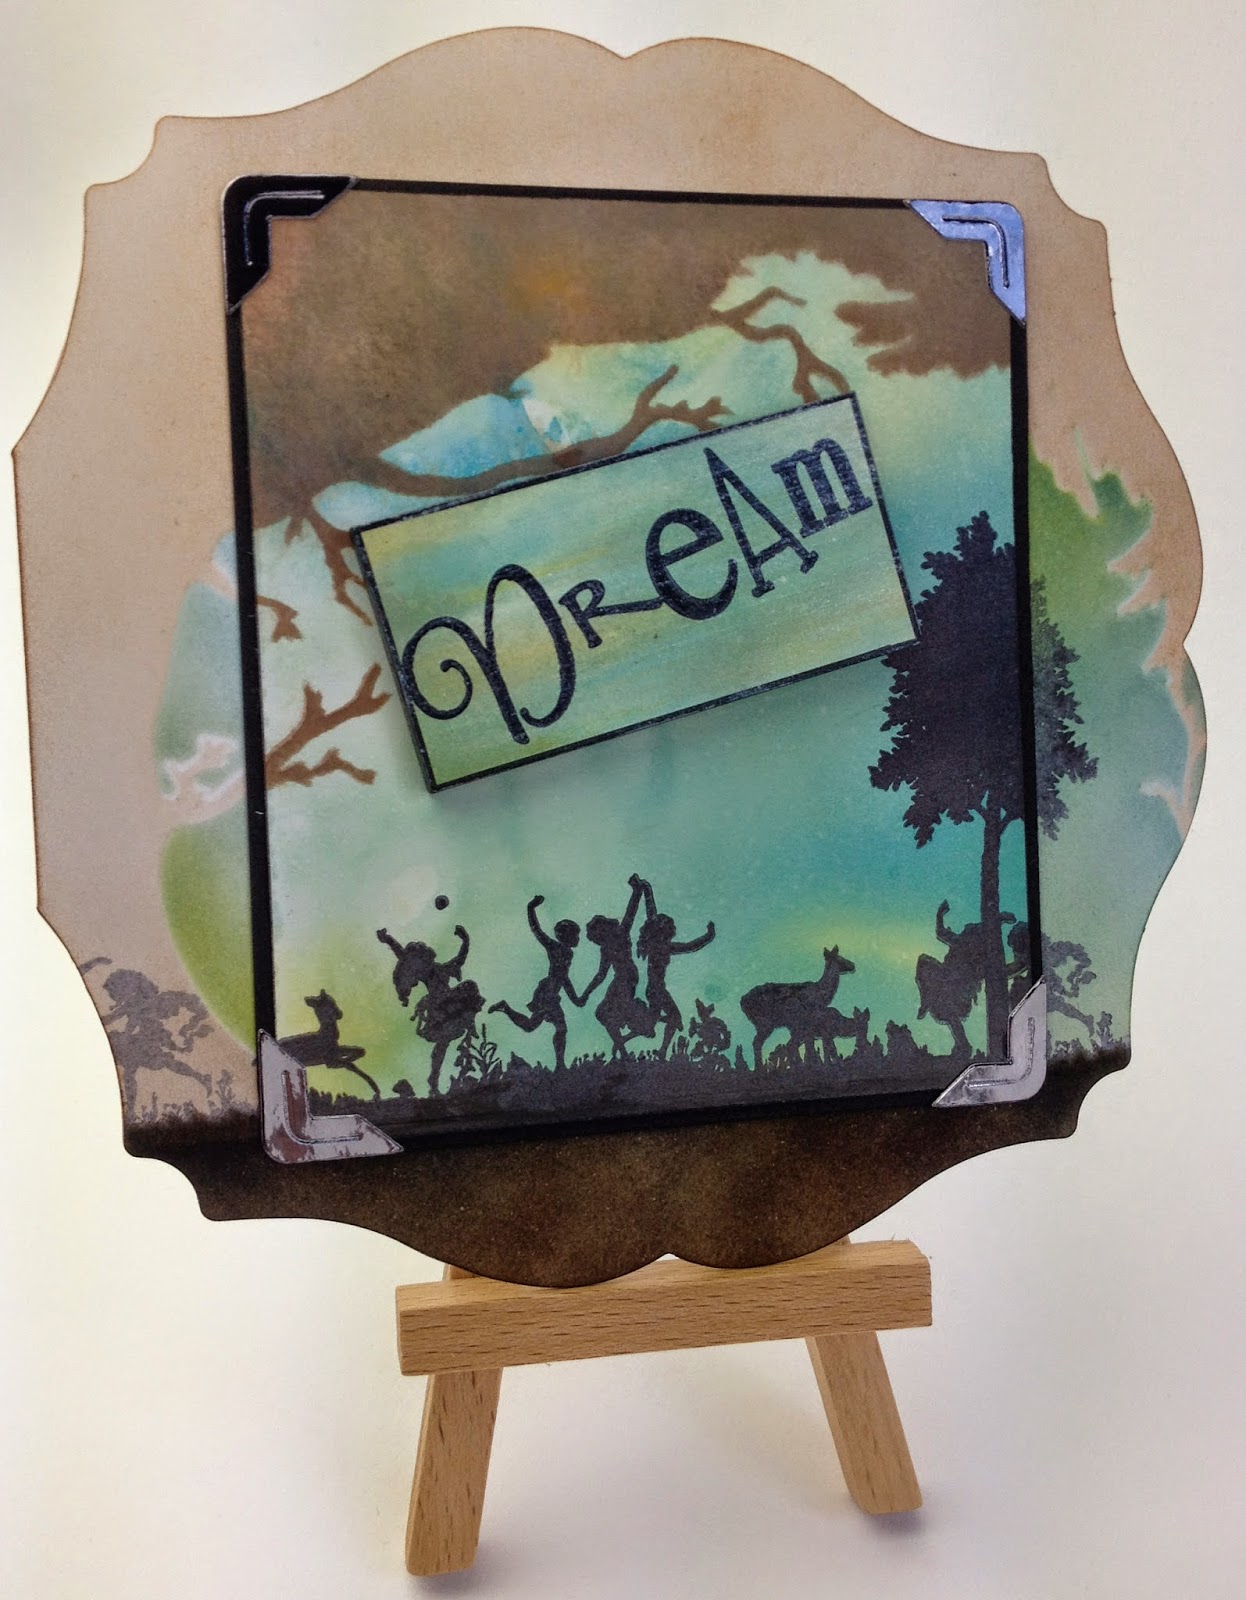
Well having had a few wonderful days in Ireland with our daughter and family it's now back to the normal routine of working, chores and crafty-playtime! After a quick tidy up of the craft room I felt a reward was needed so I reached for some old favourites--- Inkabilities by Ranger, sadly I think these are no longer produced so if you can track some down they are well worth investing in.


The centre picture had the background made with the Inkabilities and the card was coloured with Distress Inks.

Items Used

Clarity A6 Double sided coated card
Black card for mounting
Stencil and Stamps by Clarity
Stampbord
Inkabilities in Citrus, Beach Ball Yellow, Sailboat Blue and Awning Green
Black Archival Ink
Distress Inks in Tea Dye, Vintage Photo, Walnut Stain, Tumbled Glass, Crushed Olive, Faded Jeans
Versa-Magic Chalk Inks in Sea Breeze, Sage and Mango Madness
PaperArtsy Metallic Glaze
Cosmic Shimmers Antique Black Mica Powder
Pilot Pigment ink Pen
4 Corners cut using Tim Holtz Die ATC and corners

To begin with I coloured the coated card stock by placing drops of the ink onto a sheet of cellophane, then spritz with water and swipe the card through the ink several times till you are happy with the coverage.


I decided to go with the top left hand one for this project. Then using the centre part of the stencil I inked in the tree and branches using tea dye, vintage photo and walnut stain. I then stamped the children and the tree in black archival. Whilst the black ink was still damp I brushed it with the mica powder to give a slight sheen.


I then mounted the art work onto some black card and secured the pre-cut corners with some pva glue.


Next I coloured the card for which the picture would form the centre piece. I decided where the picture would sit and then matched the stencil so as to aline the art work. The tree frame was coloured with the same distress inks as before but kept much lighter. The bluey, greeny background was created using Distress inks in tumbled glass, faded jeans and crushed olive. The base was coloured with walnut stain and vintage photo. 

I then used 2nd generation black archival to stamp the tree and the children dancing with the animals so as to continue the design. 


The main picture was then secured in place with double sided tape.

Then it was just the stampbord with the word "Dream" left to do, I decided where I wanted this to sit and then proceeded to colour the stampbord in similar shades. This was achieved with the chalk ink pads and some cut and dry foam. Once I was happy with the colours I then stamped the word dream from the word chain no 5 set in black archival ink. Leave this to dry thoroughly and then hi-light the edges with the black pen.


This was then given a coat of metallic glaze.


Although its hard to pick this up in a photo the glaze really does give a subtle glimmer and an added texture to the whole piece.

This was then secured in place with some pva glue.


I would like to enter this card for the Claritystamp Challenge titled "It's all in the Words".


I hope if you are lucky enough to own some Inkabilities that this might give you a nudge to get them out and have a play and if you don't already have some if you spot some for sale you might give them a try.

Wishing you all a wonderfully relaxing Bank holiday weekend if you are here in the UK, and if  you are somewhere else and reading this I hope you have a lovely weekend whatever you may be doing. Thanks as always for stopping by, please leave any comments at the bottom of the page and if you have any questions I shall endeavour to answer them asap. 

Until next time take care and enjoy your crafting time, Jane x


Sunday, 16 March 2014

'Add Something Pink' Challenge Entry

Hi Everyone and a very happy sunny Sunday to you all. Todays blog is my entry for Lavinia Stamps monthly blog challenge titled 'Add Something Pink'. To follow the blog and see the DT lovely examples click on the link  http://blog.laviniastamps.com


ITEMS USED
Lavinia Stamps Secret Garden and Fairy House
Tornado Stencil by Andy Skinner
White greeting card measuring 15cmx15cm
White card for stamping, not too thick around 160gsm
small amount of black and pink card i.e. scraps
Smallest heart from the Inkydoodles bag of MDF Shapes
Memory Box Ivy Tendrils Die
Small flower punch
Distress Inks in Victorian Velvet, Tattered Rose, Antique Linen, Wild Honey, Iced Spruce and Pumice Stone
Versa-mark ink pad
Ranger Seafoam White Embossing Powder
Stampendous Fran-tage Aged Ivory Embossing Powder
Tim Holtz ATC & Corners Bigz Die
Pink and white Bakers Twine
Fresco Chalk Acrylics in Blush
Perfect Pearls Mica Powder in Perfect Pearl
Decoart Metallic Lustre in Black Shimmer
1 Brad


To begin with colour the greeting card with the Distress Inks using 5 of the colours but not the Pumice Stone. I started with putting a base of the Antique Linen down all over and then random patches of colour. The centre and the edges are the parts that will show when the card is complete.


Next stamp the secret garden stamp in versa-mark in the centre if the card and sprinkle with the sea foam white embossing powder. Tap off the excess well and then sprinkle a little of the aged ivory embossing powder around the edges of the stamped image and the edges of the card before heating with the heat gun. I didn't use any ink to adhere the aged ivory powder to the card as there seemed to be sufficient dampness left from the distress inks and I have found in the past when using this EP that as it's a little courser in texture you only need a very little powder to create an effect. Once embossed using a blending tool I rubbed a tiny amount of pumice stone ink over the image to help make it pop.


Now stamp the image onto a piece of scrap paper and roughly cut out. Place this in the centre of the thin white card which has been cut to 13.5cm x 13.5cm and mark where to cut the aperture. 


What you cut away does need to be accurate as you then snip the edges of the hole ready to roll back the card. This card was then coloured with the same inks. Spritz the centre edges with a little water and then gently roll the edges of the card enlarging the aperture and refining the shape of the window.

Using the stencil add a few of the curved lines to the card in the matching colour inks. Then ink the curled edges that you have rolled back in victorian velvet.

Using the edge of the fairy house stamp ink up in the versa-mark and randomly stamp the part image around the card. Sprinkle with the sea foam white EP, tap off the excess and then sprinkle the curled edge with the aged ivory. Tap off any surplus powder and then heat emboss. The aged ivory has odd specks of gold in the powder which gives a nice effect.


Tie a length of bakers twine around the aperture with a bow at the top. To secure tuck into the curled card here and there. The very edges of the card were then brushed with the mica powder to give a slight sheen.

Next onto the small heart, this was given 2 coats of the blush acrylic paint and once dry the edges were rubbed with some sandpaper back to the wood.


This was then stamped using versa-mark and the very centre of the secret garden stamp. Sprinkle with the sea foam white powder and emboss.


The 4 corners were then cut from the black card scraps and rubbed with the black shimmer lustre. Once dry they were buffed to a metallic shine. The 2 flowers were punched out from 2 different pieces of pink card scraps and fastened with a brad in the middle. I cut 1 ivy tendril from white card and this was cut into 2.

The aperture card was attached using double side tape, then the 4 corners were stuck in place using glue. The heart was threaded onto the righthand thread of bakers twine and then a knot was tied into the 2 ends. The ivy tendrils were threaded through the loops of the bow and the flower fastened with a blob of Pinflair glue.


This is not a card I would trust in the post as the centre may get crushed in the posties sack. I have to say I'm not a 'pink' girl but I have enjoyed being out of my 'comfort zone' of turquoise, blue, beige and greens!

Thank you as always for stopping by and reading todays entry, I hope there has been something of interest to you. If you have any comments, questions or queries please feel free to leave a message at the bottom of the page and I will answer them as soon as I can.

Well I'm off to do some much needed weeding while the sun is shining, I hope you have a relaxing Sunday and have a good creative week, take care Jane x


PS. There is a Mother's Day Card  Draw over on our Fb site, if you fancy entering click on the link 


Friday, 25 October 2013

Winter - Sunday Stampers Challenge Entry and Giveaway

Hi Everyone, gone all Christmasy with todays entry, the shops are getting all stocked up with their Goodies so I thought I might join them. This is also my entry for The Sunday Stampers Challenge this week and the theme is Winter, details of the challenge can be found here ink on my fingers


List of Items Used

Stamps :Tim Holtz Mini holidays 2 set
Inkydoodles Text Background
Clarity remountable Christmas Baubles
Paperartsy Jofy 28
Dovecraft T'is the Season wooden sentiments
Distress Inks :Fired Brick, Evergreen Bough, Walnut Stain,
Vintage Photo, Pine Needles
Tim Holtz movers and shapers Mini Snowflake die set
Cosmic Shimmers black pearl mica powder
Treasure Gold metallic wax in Ruby
Black card
White glitter card
Scraps of white card
String or ribbon of choice
Versamark ink pad
Clear Embossing powder
Emossing folder
Dark Red acrylic paint


Firstly start by cutting out a star from the black card, mine measured roughly 4 inches across from point to point. This was then passed through an embossing folder and I have made several using different designs and they all look good. I then stamped the holly leaves on the scraps of white card in the pine needles distress ink, made a light wash on a ceramic tile with the same ink and brushed it onto the leaves to give a paler tone for the insides. These were then cut out and put to one side.  


The stars were then given a wash made from a dark red acrylic paint which had been well watered down. Whilst the paint wash was still wet I dabbed it over with some kitchen paper to reveal the black card in places and help dry it out. Once these were completely dry I brushed over little areas with versa-mark ink using a small paint brush and then sprinkled on the black pearl mica powder. The excess was then brushed off with a dry clean brush. To complete the star I then gently  rubbed over small areas of the metallic wax with my finger and buffed this up when dry with a dry cloth, giving a lovely finish.


The next step is to create the background of the card , this was done by placing areas of fired brick and evergreen bough on the card with either a blending tool or blending brushes. This was then over stamped using a mixture of stamps and the walnut stain ink. Gradually build up the stamping to create an interesting layered effect as you can see in the picture below. The edges were then distressed using the vintage photo ink and a blending tool to give the aged and worn look. This was then lightly spritz with water, left for a couple of seconds and dabbed dry with some kitchen paper.

Now onto the final stages, the snowflakes were cut using the white glitter card and the Movers and Shapers dies. The wooden Joy was given 2 coats of clear embossing powder to help make it pop on the card. I punched a hole in the top of the star and threaded some string through and then mounted the star onto the card. The 3 snowflakes were next stuck onto the star followed by the joy sentiment.


The ready prepared holly leaves were then attached to the top of the card and the berries were punched circles cut from some tiny scraps of red card, if you do not have any red card use either white card and colour it red or  the craftwork cards candi in red or some red gems if you fancy adding little sparkle.


So there you have it a fairly easy card to construct but can be adapted to the stamps you have in your stash. I hope you have enjoyed this tutorial and if you would like to be in with a chance to win the finished card please leave a comment at the bottom of the page and a number will be picked at random from the list of entries. The closing date for the free giveaway will be Friday 1st Nov at 6pm so any comments left after that time will not be entered. The winner will be announced on the blog after the closing date so good luck to all who enter. I'll sign off for now, hope you all have a good weekend, take care and have a great time creating something wonderful, thanks for stopping by  Jane x