Saturday, 15 October 2016

The Wicked Witches' Residence !

Hi, yesterday I had a fun time creating a 'Spooky' Halloween card which I would like to enter for The Creative Carte Blanche Challenge Witchy Woman and The Craft Barn 2 weekly Challenge Pumpkin and Bat.


I started by cutting 2 houses using Tim Holtz Rickety House die, one in spotty co-ordinations card and one from card that had been coloured with Fresco Chalk Acrylic paints.


Once I'd worked out which window went  where I sanded the black die cut house and rubbed areas with Treasure Pewter.

Next I stamped the bat, pumpkin, broom, and hat onto scrap card and clear embossed so as two make cutting out a little easier. These were coloured with Distress Makers and a silver Pro-Marker.

The banner was cut from kraft card using Tim Holtz Alterations Tattered Banners die and stamped with Wicked Witch and heat embossed in black.

The card blank was coloured using Distress inks in Weathered Wood, Stormy Sky and Pumice.
The cobwebs were added using pumice.


I don't normally make Halloween cards but I must admit this was fun to construct and I think the bat is quite evil!!

There is no visible witch in this project so I hope the Creative Carte Blanche will accept this entry.

Many thanks for stopping by, I hope your weekend is full of fun and relaxing things, maybe even some crafting!
Take Care, Jane X


Friday, 7 October 2016

Thrilling News----

Hi and welcome, today I am thrilled and excited to be able to tell you that I've been chosen to join The Craft Barn Blog Design Team. There was recently a post asking for people interested to apply and as I had been a customer of the shop at Lingfield and then Nutfield I felt a strong connection with the business which I wanted to continue.

We were having a couple of nights away in the camper van when I  found out I was one of the lucky 3 to be accepted and I was so chuffed and excited. A few days later the list of themes/topics arrived and I am now preparing various projects for the next couple of months.

My first sample was accepted and went out on the blog entry titled Alcohol Inks and Yupo.


To see how I made this card and a tag click here.

This weeks theme is Dimensional Crafting which I love, so had to add this to my chosen list. There have been 2 samples by other team members on the blog which are both very different and stunning. One is a gorgeous altered tin and the other a beautiful die-cut and stamped bird cage. 

To see these wonderful pieces grab a coffee and pop over to  The Craft Barn.

My entry will be posted tomorrow so to find out what I made with these embellishments please head over and have a peep.


Thank you as always for stopping by today and please do have a look at The Craft Barn's blog and maybe enter one of their 2 weekly challenges. See you soon and take care, Jane X.


Tuesday, 20 September 2016

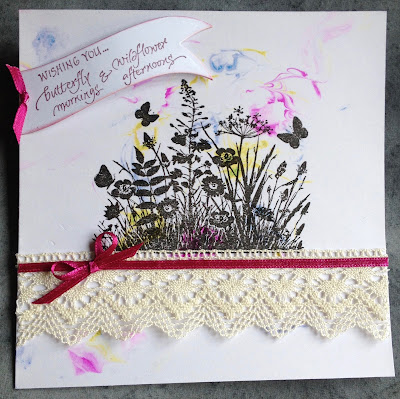
Good evening and welcome, today after downloading some recent photos taken will we were away for a few nights in our camper van I found myself looking at this particular picture of a beautiful sunset.


The silhouette of the tree on the right made me think of a Crafty Individuals stamp set 367 ----- so off to the work bench I went.


The background was made using shaving foam and alcohol inks.


I printed off several pieces of card and tags for future use.

The image was then stamped in black Versa fine ink, cream lace attached underneath the image and some raspberry pink ribbon.


The wonderful sentiment from CI 410 was stamped in Brilliance Pearlescent Crimson onto a spare piece of white card then cut out using a die from Spellbinders ribbon banners LG. the edges were then lightly brushed with Seedless Preserves DI.


I was very pleased with the background and feel the colours gave the effect I was hoping to achieve.


I would like to enter this card for ;

The Craft Barn Challenge Around the House.
and
Crafty Individuals Challenge Clean and Simple.

Thank you for stopping by tonight, hope you have a good week and take care  Jane x


Sunday, 4 September 2016

Stamping onto Linen

Hi, today I had a spare hour or so and thought I should really make a couple of cards ready for general birthday/greetings because the nearer it gets to shhh - 'Christmas' -- eek the harder it is to get anywhere near my work bench!
So here's my 2 cards which I would also like to enter for the Crafty Individuals bi-monthly challenge titled 'Clean and Simple'.


I started by lightly colouring a small off cut of white linen with distress inks and a brush and then stamped the image in the centre.


I did the same with another piece of linen but using different colours and a different image.


Next I trimmed the material and frayed the edges.


The edges of my card blanks were lightly coloured using the same distress inks that I had used on the linen.

I then cut some kraft card slightly larger than the pieces of material and distressed the edges before using as a mount for my stamped images.


I added a blue bead and some stitching, stamped the sentiment in Archival Cornflower and then added the lines with a very fine black pen.


The body of the butterfly had 8 or 9 very small beads threaded on some black cotton and then added 4 running stitches on each antenna.


The sentiment and 4 corners were stamped using Brilliance pearlescent olive ink. All the stamps were  by Crafty Individuals.

I was surprised at how quick these cards were to make as so often I think something will just take 30mins and it ends up taking a couple of hours or more!

I am pleased with the clean appearance of the finished cards and hope this fills the brief of Crafty Individuals Challenge.

Thank you as always for popping by today, all your comments are very much appreciated, take care and have a good week, Jane. X


Sunday, 28 August 2016

My Attempt at making the Leandra Bead!!

Hi and welcome, this fortnight over on the PaperArtsy Blog the challenge is 'Beads, Charms and Dangles'. There are lots of wonderful examples to whet your appetite, but it was the video of the Leandra bead that really inspired me to get out the Melt Pot --- ( which when the temperature outside has been in the 30's for the past few days is not normally the first craft I'd jump too!)


To make the beads I followed the video as best I could with what head pins, Utee etc that I had in the craft room stash.


The head pins were only 45mm and having had a go I would now buy some slightly larger ones.


To start with the pan only had clear Utee added but gradually as I popped the growing beads into various shades of blue EP lovely streaks appeared  adding extra pattern and design to the beads.


Then as the contents of the pot got a little muddy I added some Primary Apple Red, Ancient Copper Metallic and the tiniest spot of black. 


Oohh thats yummy! 


These 2 beads were shaped by pressing the round bead onto the sides of the melt pot.


As the Utee level was going down and making the covering of the beads more difficult I decided to pour the remaining contents onto the craft mat and inked up a rubber stamp with Archival Black ink and pressed it into the very hot, molten Utee.


Once cool the stamp was removed and I rubbed in some Treasure Gold in Ruby and Renaissance but ------- was not completely happy with the result so decided to cut my losses and got the heat gun out and melted the piece on the craft mat---(" Is she mad " I can hear you saying!) Well I was very pleased with the end result as the wax melted just on the top and gave a lovely marbled effect. I then very lightly added a little Pewter wax to hi-light the edges of the letters.


When I started to make these lovely Leandra beads I had no idea what I was going to use then for but was itching to make something ----

So I now have a pair of unique ear-rings
and


some lovely beads for future projects.

A big thank you to PaperArtsy for the very inspiring video and I'm now off to order some larger headpins and another pot of clear utee !
Hope you all have a great weekend and if you live in the UK enjoy the Bank Holiday if you're lucky enough not to be working. Bye for now and take care Jane x


Monday, 15 August 2016

'Dream' Tag

Hi, it's been a while since I last did a blog entry but with having a fab week in Cornwall, a few odd days out in the Campervan, lots of gardening and a wonderful few days in Ireland visiting our gorgeous Grandchildren there hasn't been an awful lot of spare time. Ooh and I forgot to mention -  the odd bit of crochet--------


Anyway back to the job in hand! Over on the Creative Carte Blanche Blog their theme for August is Sun, Moon and /or Stars so here is my entry for this month.


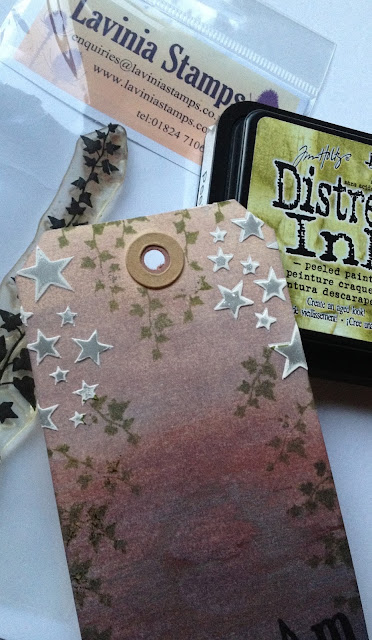
I started with a large manilla tag which was coloured with various Pan Pastels, this was then lightly sprayed with Jackson's Pastel Fixative.


Next I stamped the shimmering moon by Clarity Stamps in VersaMark ink and rubbed the stamped image with Pewter Pan Pastels. 


Dream was then stamped underneath in Versafine Onyx Black and then clear heat embossed.


The stars were added using Grunge Paste through a That's Crafty Dinky Stencil, once dry lightly sanded and then the clean stencil was replaced and the stars coloured in the centres using Treasure Pewter wax.


The ivy was stamped using peeled Paint Distress Ink and a Lavinia Stamp. 

Recently we have had some beautiful sunsets and star lite skies and this gave me the colour tones to work with for this entry. Hope you are all enjoying the summer sunshine that we have been finally blessed with as up until now the summer has been rather dull --- so long may it last.

Enjoy the rest of the week and hopefully you too will find some free time to have a 'Play" and maybe join in the Creative Carte Blanche challenge. Bye for now,  Jane X


Saturday, 18 June 2016

"If I Had Wings" !

Over on the Creative Carte Blanche blog this month the team are challenging us with a theme titled "Winged Things"which after much thought about fairies, bees, dragonflies, etc, etc I came up with the following tag.


If you have 10 mins do click on the link here and browse through the DT's samples and the other entrants.

I began by painting a large manilla tag with fresco chalk acrylic in Space Cadet, then a coat of Americana Weathered wood and then once dry a top coat of Vanilla paint.
The edges of the tag were then distressed with vintage photo and peeled paint DI.

Below is a photo of the main items used.


Next I stencilled on the roof tops with walnut stain ink and hi-lighted the edges with a fine black pen.

The boy in flight was stamped in verso fine black onyx and embossed with clear powder. The area around the boy was then lightly touched with Treasure Pewter to give the impression of movement.


A cluster of stars were added to the top using a small stencil with scattered straw ink and then brushed with perfect pearls for a light shimmer.


If I had wings was stamped in Archival cornflower blue ink and then clear embossed.

The journey token was from Tim Holtz idea-ology muse token set.


The light was shinning on the embossed parts which made taking photos a little difficult but I hope you can decipher the different textures etc.

Another great challenge ladies, it's great to be able to rummage through ones stash of crafting goodies without worrying about which company or make each item is from -- thanks.

Hope you all have a good weekend and that the sun may shine on you, as here in Kent it's been Very grey and Very wet for far too long! Take care and many thanks for stopping by today, Jane x