Friday, 8 August 2014

Wedding Card with Vellum Flower

Hello, and happy friday to you all. My card today was inspired by mondays entry over on PaperArtsy's Challenge Blog by Keren Baker titled Sky and Grass. I needed to make a wedding card for a work colleague and dear friend but hadn't been able to decide on the design until I saw Keren's vellum flower and leaves and here is the finished card.


I started with a piece of cartridge paper which I coloured with Distress stains, a brush and lots of sprayed water. Once dry I random stamped the wire netting stamp from Jofy 12 in Walnut Stain and then stamped the marriage sentiment from Personal Impressions Love Text by Lindsay Mason in Versa-Mark and embossed with white EP.
The edges were then rolled and inked using Vintage Photo.


The card base was coloured on the edges with Distress Inks in Tumbled Glass, Victorian Velvet, Bundled Sage and Milled Lavender very lightly using brushes. Then the top righthand and the bottom lefthand corners were stamped on versa-mark and clear embossed using the seed head stamp also from the Jofy 12 set.

The flower and leaves were stamped onto some rainbow coloured vellum using versa-mark and white embossing powder. The flower was from PaperArtsy HP1001 stamp set and the leaves from Jofy 12. These were then cut out and curled over a pokey tool.


The flower without the stalk was layered onto of the other one using double-sided foam.

The outer frame was cut using Memory Box Trailing Vine Frame Die from white card.

The mdf heart was given a coat of white gesso before painting with PaperArtsy Fresco Chalk Acrylic in Mermaid. Then once dry a coat of Americana Weathered Wood was applied left to dry and then a top layer of Fresco Chalk Acrylic in Nougat. This was then stamped in walnut stain using a Docrafts stamp.


The tiny cream card tag had the edges coloured with the victorian velvet ink before applying the peel-off numbers---- this being the date of the wedding.

I gathered some cream cotton lace for the back of the heart and threaded 3 pearl beads onto some sewing cotton to attach the tag to the heart. The bow was tied from a length of cream silk wool.

Once everything was stuck in place I then added 3 dots each side of the frame in liquid pearl in bisque and entwined the couples initials in white glitter card and stuck these just to the side of the lace.


It's hard to pick up on camera but you can just see the clear embossed flowers in the 2 corners.


I like the texture this gives to the card base.


I was really pleased with how the vellum flower turned out.


I wanted a non-traditional wedding card  and I feel I've achieved that but with the date and initials it's been made very personal.

I would like to enter this for PaperArtsy's weekly Challenge ending on Sunday 10th Aug
and Hels Sheridan's Sunday Stampers titled Bits and Pieces.

Thanks as always for stopping and reading this blog and if you have time to leave a comment they are always much appreciated. Until next time have some great crafting time, take care Jane x


Saturday, 2 August 2014

Peeled Paint Wooden Christmas Hanging

Todays offering was inspired by Liesbeth Fidder's Peeled Paint Hanging Board over on PaperArtsy's weekly Challenge, if you have a few spare moments do pop over to their blog and have a look at the DTs gorgeous samples for the week.


Main Items Used
An off cut of tonged and grooved wood
Cardboard packaging
Smooth white card
White Gesso
PaperArtsy Fresco Paints in Mermaid, Snowflake, Pewter, French Roast and Inky Pool
PaperArtsy Grunge Paste
Vaseline Jelly
PaperArtsy LPC 011 stamp set
Stampers Anonymous Mini Holidays 2 stamp set
Tando-Creative Reindeer Masks
Archival Jet Black ink
White Embossing Powder
Stampendous Aged Ivory Embossing Enamel
Dovecraft Wooden Sentiment

To begin with I sanded the wood to a very smooth finish.


I gave it a coat of white gesso before applying several layers of mermaid and snowflake paint. Once dry areas were then lightly sanded to reveal touches of the wood.

2 screw in eyes were attached to the back of the wood for hanging and 2 screwed onto the bottom to attach the cardboard to.

The cardboard packaging and the white card were also painted at the same time.

The wood and the bottom edge of the cardboard were then stamped with the pine needles image using the black archival. I then added some Inky Pool paint around the edges with a sponge.


Next I lightly coloured some grunge paste with the french roast paint and applied this through the reindeer masks, the smaller one was done first. Once these were completely dry I then rubbed them with Treasure Pewter Wax Gilt and Metallic Lustre in Black Shimmer and buffed with a soft cloth.

The painted card was then stamped using the bottom edge of the main stamp from LPC 011 in black archival ink. 
Once dry areas were then applied with the vaseline jelly and then a coat of pewter paint was brushed on with a couple of small areas of the inky pool also. This was then left for several hours to dry.

Using a soft tissue the artwork was then rubbed all over, were the vaseline had been applied the top coats of paint then peeled away!


Really love this effect.

The edges of the wood and the cardboard then had the stampendous enamel applied and heated.

The wooden Jingle Bells sentiment was give 3 layers of white embossing powder and before heating the finally layer a tiny amount of turquoise glitter was sprinkled on the J and B.

The peeled paint card was then stuck onto the cardboard before attaching the 2 eyelets at the top.
The glass star and silver bells were attached using 3 star shaped brads that I coloured with a silver Pro-marker pen.
Thin leather cord was then used for the hanging and tying the 2 pieces together.


I was amazed at how well the paint rubbed off where the vaseline had been applied, this is a technique I would definitely use again so a big thank-you to Liesbeth.


I would like to enter is hanging for 
PaperArsty's Weekly Challenge 
and
Sunday Stampers weekly Challenge titled Winter.


Thank-you as always for stopping and reading this blog, I hope there is something you might be able to take away and have a play with at sometime. Enjoy your week-end and take care Jane x

All comments and questions are greatly appreciated.


Thursday, 24 July 2014

"Come Fly With Me" Tag

After spending a few days away in a gorgeous spot in Cornwall -------


It's now back to the normal routine of work, housework and the most important part playing and getting inky and painty!

I was lucky enough to be last months winner of the Tando-Creative challenge so was eager to play with my prize which fitted in very well with their new challenge so here is my entry for 
"Come Fly With Me"


I started by painting the tag with a coat of Fresco Chalk Acrylics in Inky Pool, then once dry a coat of Americana Weathered wood but not adding this to the top left-hand part of the tag. Once this was dry I painted the whole tag with a coat of Fresco Chalk Acrylics in Nougat.

The area where the weathered wood was not applied I then lightly sanded to reveal some of the inky pool.

I then stamped the hot air balloon from the PaperArtsy  Hot Picks 1106 onto clear shrink plastic using Versa-Magic Ocean Depth and Brilliance Starlight Black ink. This I left over night to dry and punched a small hole at the top before shrinking with a heat gun.


Next I stamped Lady's Mantle from Clarity Stamps on the side using versa-mark ink and clear embossing powder.

The fern leaves were added using the ocean depth ink and the waste part of a fern leaf die by Memory Box.


 The dots were added using the Tando-Creative Sequin Waste mask and the ocean depth ink.


I then applied a couple of strips of Tim Holtz tissue tape to the top right part of the tag.

Now onto the Butterflies which were part of my goodies, these are from the mini set and I used a small, medium and large. These were first given a coat of white gesso, then I dabbed on some Zesty-Zing acrylic paint to give a slight texture.


You can pick up the texture in the close up photo.


Once this was dry I then over stamped using InkyDoodles Text Background and Archival Watering Can ink. The edges of the butterflies and the tag were lightly inked with Brushed corduroy Distress Ink.


3 gems were then stuck on the centre of each butterfly.
The 2 small tags were cut from Tim Holtz die Tiny Tabs and Tags, one was stamped with Take Flight from InkyDoodles Happiness is-- stamp set and Fly was applied using rub on letters. Both small tags were then inked round the edges with the brushed corduroy.

A length of jute ribbon was used for the top of the tag and to attach the 2 small tags and the shrink plastic balloon was tied on with some navy thread.

Before attaching the 3 butterflies I coloured some floristry wire with the brushed corduroy ink and then twisted it around a cocktail stick and this was used to connect the butterflies.


The blue of the inky pool and the ocean depth really makes me think of the beautiful sea at Cadgwith Cove.


Well I hope you are managing to keep cool during this very hot spell, take care and thanks as always for stopping by. Hopefully we will meet up again soon, Happy Crafting. 

All comments and messages are much appreciated, bye for now Jane x


Friday, 11 July 2014

Summer's Here !!

A very happy Friday to you all and the title of this blog entry really doesn't reflect with what's  happening outside the window, ( grey and very damp!) but hey we can dream a little.


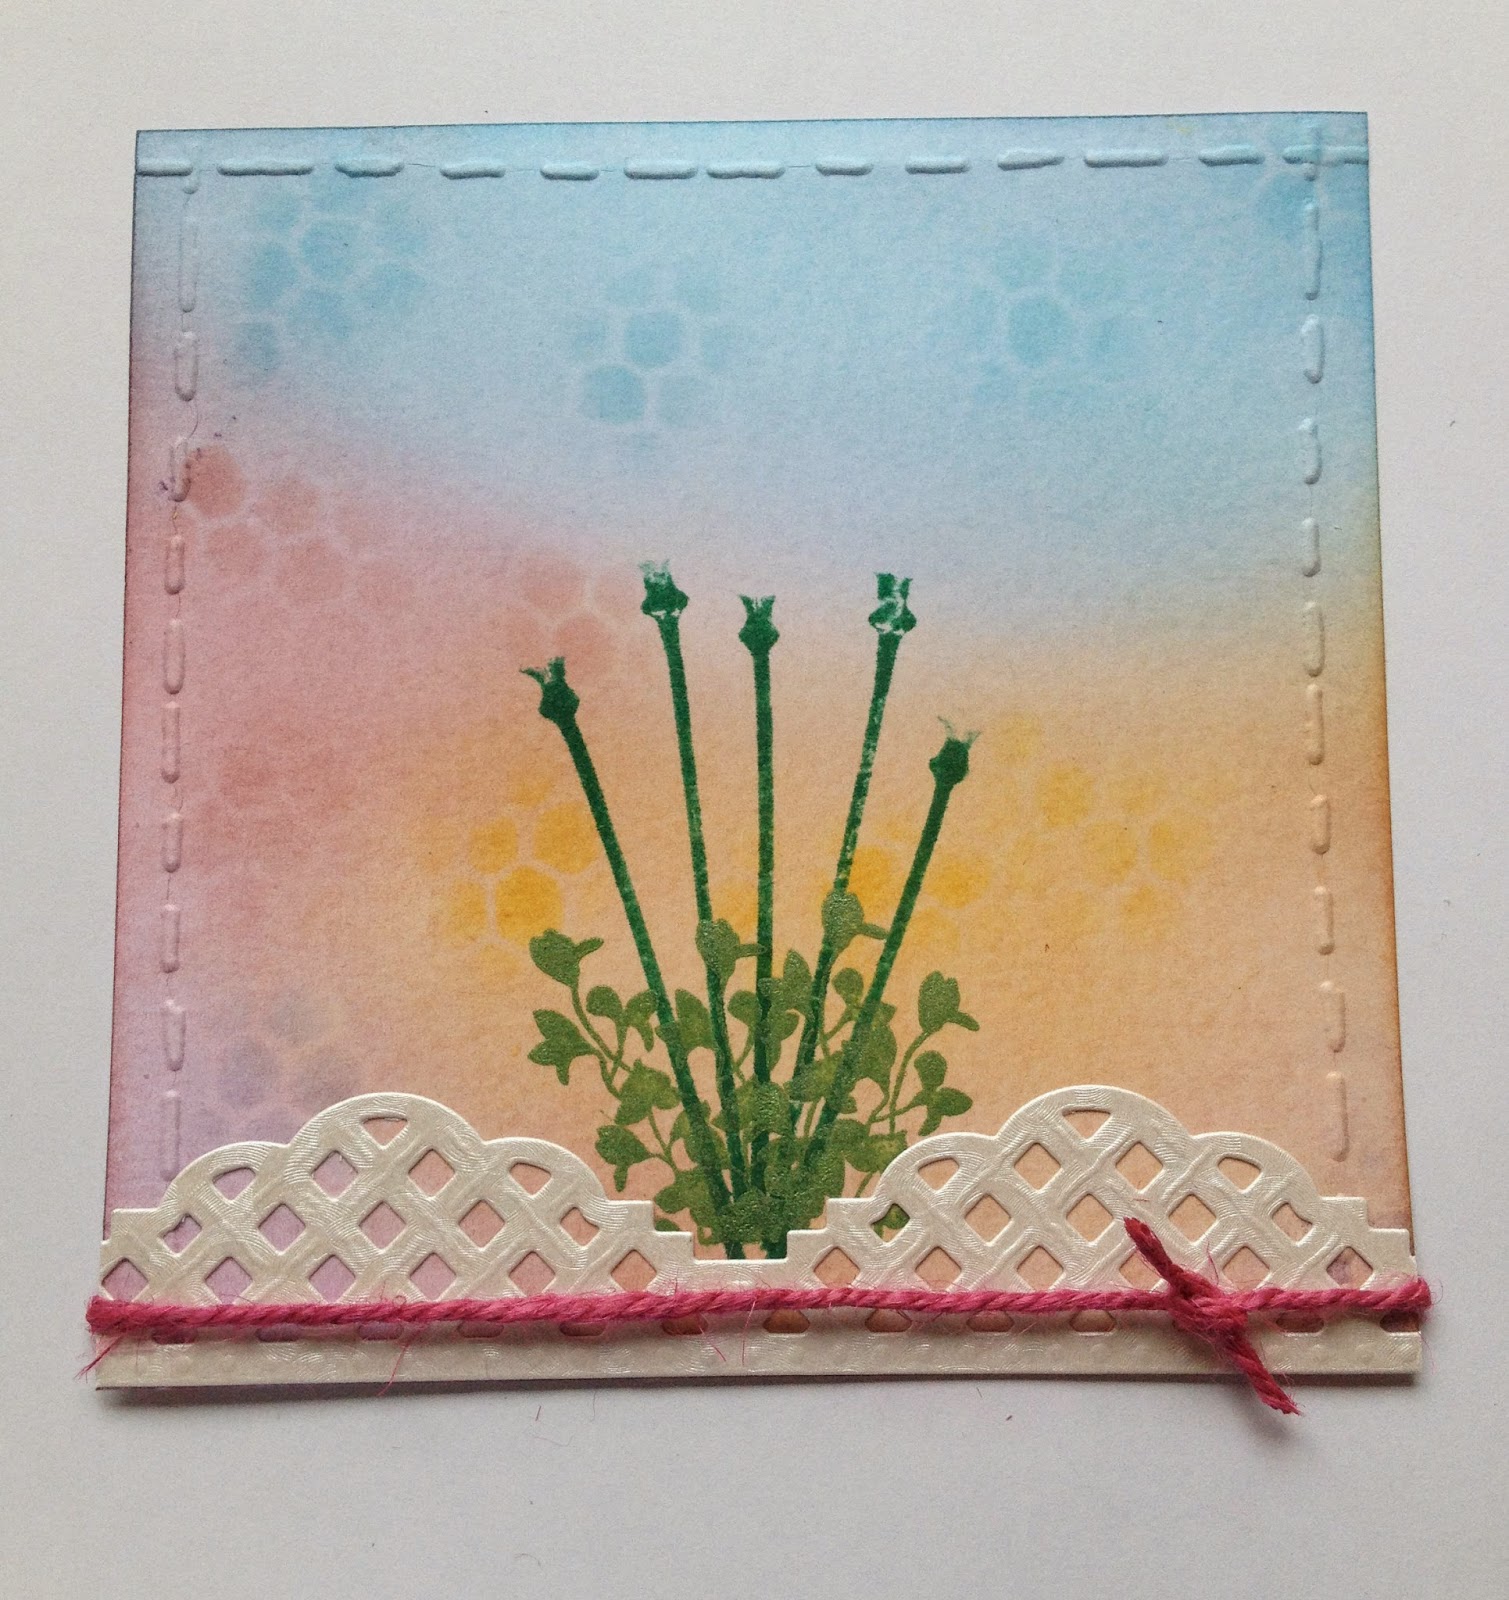
Walking around the garden earlier this week I felt I wanted to make a card that reflected the colours of the flowers in bloom at the moment i.e. nicotianas, calendars, roses and zinnias.


Items Used

Lavinia Stamps; Zen Flower 2, Poppy Pods and foliage from the magazine freebie
Distress Inks in Faded Jeans, Tumbled Glass, Lilac Shades, Victorian Velvet, Wild Honey and Pine Needles.
Piece of white card about 14cm square + smooth white card for stamping flowers on.
Pro-Markers in Lipstick Red, Pumpkin and Lime Zest.
Tim Holtz embossing folder from Pattern and Stitches A2 set
Clarity Honeycomb Stencil
Perfect Pearls in bisque
Brilliance ink in Pearlescent Thyme
Lattice die from Spellbinders
Stickles in Crystal
Length of fuchsia coloured string
Black Archival ink pad
Versa-mark ink pad
Clear and white Embossing Powder

To begin with I stamped various flowers in black ink onto white card and then embossed with the clear powder and also versa-mark ink and white embossing powder. These were then coloured in using the pro-markers and cut out. The buds were formed by using 5 petals from a flower, curling them and then sticking the tips of the petals with some pva glue. I stuck petals 1, 3 and 5 together first and the brought in petals 2 and 4, so as to form a layer.


The main flowers were made of 2 layers glued together and a piece of Craftwork Cards candi used for the centre.


I then coloured the background card using the distress inks and a brush. Once happy with the tones I added subtle areas of matching colour ink using the honeycomb stencil and a sponge.
Once dry I embossed 3 sides with the stitch embossing folder.


Next I stamped the flower stems by inking the the poppy pods stamp but not inking the actual seed head. For this I used the pine needles ink.

Then the leaves were added using the pearlescent thyme ink which gives a slight shimmer.
The white lattice die cut was then stuck to the bottom of the card and trimmed to size. The pink string was then stuck to the back and knotted at the front.


Before attaching this to the card blank I added a very small amount of corresponding coloured ink to the edges of the card just to tie it all in.

The 2 lower flowers were attached first and the the 3rd centre one, next the 2 buds/ seed heads depending how you look at them. Next I added the dots of perfect pearls and then added a smidging of the stickles to the 2 outer petals of the buds.


I would like to enter this for Lavinia Stamps monthly Challenge titled 'Summer Colours'.

Well I hope the sun pops its little head out for us all over the weekend, Have a good one whatever you may be doing and if its raining there's always ink to play with !!

If you have time to leave a comment at the bottom of the page I would appreciate hearing what you think.

Take Care and thanks as always for stopping by Jane  x


Thursday, 3 July 2014

Window Canvas


Hi everyone and a very happy thursday evening to you all. Todays offering was inspired by Liesbeth Fidder's Altered Canvas over on PaperArtsy's blog, to view this click on the link ;

The Main Items Used
10cm x 10cm canvas
Thin scraps of wood
White Gesso
PaperArtsy Stamps Lynne Perrella Collection LPC011 and Jofy 28
Small amount Lace
Tissue Paper
Archival ink in Jet Black and Sepia
PaperArtsy Grunge Paste
Clarity Brick Stencil
Fresco Finish Chalk Acrylics in Blush, Inky Pool, Zesty zing, Mermaid, French Roast, Nougat and Snowflake
Distress Stain in Antique Linen and Gathered Twigs
Distress Inks in Walnut Stain, Tea Dye, Brushed Corduroy, Pumice Stone and various shades of green
Treasure Gold in Sapphire and Ruby
DecoArt Metallic Lustre in Black Shimmer
Dylusions Alphabet border small Stencil

To begin with I gave the canvas and the strips of wood a coat of gesso. Once dry I stamped randomly some text with walnut stain onto the wood and then added some ink to the edges to give an aged look.


I then coloured the white lace with some watered down distress stain.


Now using Liesbeth's idea I stamped the image from LPC011 collection in jet black ink onto some crumpled tissue paper. Once completely dry I attached it to the canvas using some watered down PVA glue.


If you look hard at the stamped image you can see there is some ripples in the tissue paper----
I then heated it gently with the heat gun and hey presto it became completely smooth!


Before reading Liesbeths blog entry I would have tried stamping straight onto the canvas but I am so pleased with the effect the tissue paper gives.

Next I added the honeycomb using the sepia ink and a stencil on the plain part of the canvas, and the grunge paste was smoothed throughout the tiny squares on the Dylusions stencil. Once this was dry I added the colour to the canvas using the chalk acrylics.


I then added some odd stamping using pumice stone ink and the edge of the V from the stamp with the 3 crowns on the set.

The lace was added as the curtain and then the wood was attached to form the window frame.

I then raided the button box and found a rose shaped button but it was a revolting pink so it was given a coat of copper paint and then hi-lighted with the black shimmer wax.

The grunge paste was hi-lighted with the sapphire treasure gold.


Next using a piece of white card I then made the brick effect with the grunge paste and the brick stencil. Once dry I cut it to shape and gave the whole piece a coat of watered down acrylic paint.


The bricks were then coloured with D.I. and hi-lighted in places with the ruby and black shimmer waxes.


This was then attached to the canvas raising the corners to the same level as the wood with some double sided foam.

I then stamped several ivy leaves from the Jofy stamp set and coloured them in with various shades of distress ink. These were then cut out and curled to give some shape and form. I found some dry thin sticks and added these to the bricks before attaching the leaves and a few rose buds.


Once these were all added I kept starring at the piece but felt it still need something----


and then decided on the banner with "Dream"


I would like to enter this for PaperArtsy's weekly Challenge,
and Sunday Stampers titled 'Knock on Wood"

Well it's fast approaching the week-end so I hope you all have a peaceful and restful time, thanks as always for stopping by and hopefully we will meet here again soon. Take care and enjoy some quality crafting time Jane x


Monday, 23 June 2014

Customised Ink Pads


Hi to one and all and phew, what a hottie--- all very well if you are on the beach but I don't recommend working in greenhouses for a living in this weather! As much as I love the plants I think I need watering more than they do.

Todays tag was made from the spare card left from my last blog ( details of paints and stencils can be found in the previous entry titled "Life is too short to be anything but Happy") which I trimmed to size, punched a hole and added a ring made of kraft card to reinforce the hole ready for the ribbon.


The dots were already on the card and I randomly stamped the wire in Pumice Stone ink. The letters at the top left were added using grunge paste through a Memory box stencil called Alpha Worn Out. Once dry I inked all the edges and the grunge paste with Bundled Sage ink before replacing the clean  stencil and lightly touching the letters with Treasure Gold wax in Olive Bronze.

 Then using PaperArtsy stamp set Jofy 12, I stamped the stems in Peeled Paint ink without inking the leaves as these were not required. Next I brushed Peeled Paint ink through a honeycomb stencil to add a little more interest and depth.


Now onto the making of the ink pad.
I cut a piece of Cut n Dry Stamp Felt from Ranger and to this I added drops of Ranger Distress Re-inkers in Peeled Paint, Broken China and Festive Berries. This was left for 25-30 mins for the inks to soak in and blend into each other. 


Then I used it as normal for inking up the stamps, using the Jofy set again but this time the leaf and the oval flower head were stamped onto white card. These were then embossed with clear embossing powder whilst still wet .


Next I cut the leaves and the flowers out, coloured the very centre of the flowers with a pencil and then coated the centres in Glossy Accents. The leaves were inked lightly with peeled paint.

The fuchsia pink felt flowers were cut using 2 Sizzix Movers and Shapers Dies and were then attached to the top of the stems with Pinflair glue. Once the glossy accents was dry the stamped flower heads were then stuck onto the felt, and the leaves were curled before attaching to the stems.

The decorative edge on the bottom of the tag was cut using Tim Holtz on the edge Ornate Die.

The sentiment was a stamp from Wendy Vecchi's Studio 490 Flower Art set and was stamped in Versa-mark and white embossing powder onto kraft card that had been cut using a Tim Holtz Movers and Shapers Die. I went around the edges of the kraft card with a black pen to help draw the eye in. This was glued in place and finally I attached the metal leaf from Tim Holtz Idea-ology Foliage pack.


The home made ink pad will keep moist for a couple of months or more if kept in a sealed cellophane bag.

I would like to enter this tag for Hels Sheridan's Sunday Stampers Challenge titled "Green".

I hope there has been something of interest in todays entry to you and thank you for stopping by. Please leave any comments or queries at the bottom of the page, it's great to hear your thoughts.

Take care and have a good week, bye for now Jane x


Thursday, 19 June 2014

"Life is too Short to be Anything but Happy"


Hi everyone and I hope you are all well and are  cheering our team on this evening!!! Todays creation I would like to enter for the Tando Creative Challenge titled " Life is too Short to be Anything but Happy" and if you would like to see the DT examples and the other entries click on the link  http://tando-creative-challenges.blogspot.co.uk

For this card I have used;

Smooth white card
 PaperArtsy Fresco Chalk Paint in Mermaid, Guacamole, Blush, Nougat, Snowflake, Toad Hall, Zesty Zing and French Roast
Tando Creative Stencils; Sequine waste, Bird and Branch and Tornado
Archival ink in Watering Can
Distress Inks in Walnut Stain, Spiced Marmalade and Bundled Sage
PaperArtsy Grunge Paste
Items from Tando Creatives Mini balloons and Mini Houses and Fencing
Treasure Gold in Olive Bronze
Versa-mark ink pad
Yellow Embossing Powder
Orange card for mounting
Clarity stamps Tree and Children dancing
Black Pearl Mica powder

To begin with I coloured the smooth card with the paints using a brayer, then using a stencil brush and the sequins waste stencil added dots to the bottom and then stamped with watering can the wire mesh areas and the script. The sun area was added with the Zesty Zing paint, tornado stencil and a piece of cut and dry.


Once dry I re-laid the tornado stencil at a slightly different angle and with the spiced marmalade ink and a sponge lightly inked through the stencil.

The balloon was coloured using 3 coats of embossing powder and the fencing was painted in the snow flake chalk paint.

Next using the bird and branch stencil I masked off the areas I didn't want to use with some post-it notes, coloured some grunge paste with the toad hall paint and then scrapped the paste through the stencil with a palette knife.


Once dry I added a little bundled sage ink to enhance the colour and then rubbed over with the treasure gold.

The children dancing and the tree were then stamped in the watering can ink and whilst still damp the tree was brushed with the black pearl mica powder.

The words were printed on the computer and then mounted onto orange card.

The balloon then had some thread tied around the end, the length of cotton was then threaded through a needle and passed through the hand of the middle girl and out again close by to give the impression of the string being held.

The picture was then trimmed to size the edges coloured with a black pen and then the whole piece mounted on the orange card.

The edges of the mount and all the edges of the words were then coloured with a black pen.

The fence and the balloon were then secured in place with pva glue.


Well thats it for me tonight, the score at the moment with the footie is 1 all so lets have a big shout for the England team!

Hope you all have a good evening and hopefully see you back here soon for some more creative  ideas. take care and as always thanks for stopping by, until next time bye for now Jane x


Opps England are now trailing 2-1